It’s simple to figure out how to connect solar panels to RV batteries.
But when working with electricity, things may go south very fast.
This relatively straightforward operation might become your worst nightmare with just one incorrect connection.
Therefore, before you start working on your RV solar power system, you will need some instructions and suggestions.
This blog article attempts to provide you the resources and information needed to get started.
Here, we’ll guide you through the process of attaching your solar panels to RV batteries and other crucial parts of the solar system, such inverters and controllers.
However, before we get started, here is a list of the equipment you’ll need.
Basic Elements
- Solar cells
- A deep cycle 12 volt solar battery
- Charge regulator
- PV inverter
You will also want a screwdriver, copper wires with clips, electrical tape, and several MC4 connectors in addition to the other parts.
How to Connect a Solar Panel to an RV Battery
Connecting a solar panel’s positive wire to the positive battery terminal and its negative wire to the negative battery terminal is the easiest method to connect a solar panel to RV batteries.
The solar battery pack will be pleasantly charged as a consequence, and your RV’s appliances will also be powered.
However, there might be two issues if a battery is connected directly to your solar panels.
- Charged-up batteries
- Overcharging a battery
When the battery is completely charged and no solar energy is falling on the solar panel, the first problem often occurs.
The battery might slowly be discharged since electricity can slowly flow back into the solar panel.
There is very little current leakage, and you may stop it by adding a blocking diode to the line.
The diode serves as a one-way electrical valve that stops electricity from re-entering the panels.
The second issue is significant since it has the potential to harm the batteries and the appliances.
The solar panels might overcharge the battery and overheat the battery if left on their own.
Use a charge controller to prevent battery overcharging by cutting off the flow of solar energy after the battery is full.
Assemble solar panels and RV batteries according to the detailed instructions below.
Step 1: Mount The Solar Panels
Installing the solar panels on your RV using the mounting brackets is the first step before connecting them to the battery.
It’s critical to locate the solar panel on the RV roof so that it receives the most sunshine possible.
Although you can immediately connect solar panels to an RV’s batteries, you’ll need to build a structure on the RV’s roof to accommodate other kinds of solar panels.
Aluminum rails are recommended because they are lightweight, strong, and able to endure strong winds.
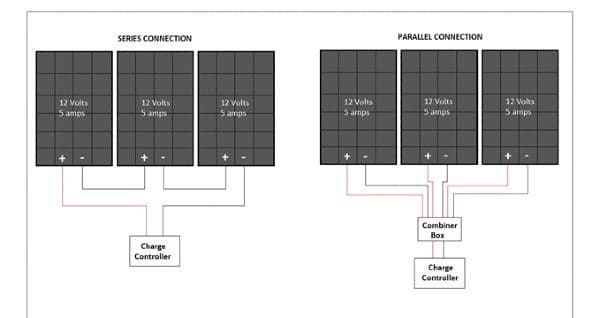
If you have a lot of solar panels, you may choose between the two wiring solutions below.
- Comparative Wiring
- Wiring in series
The negative terminals of the solar panels are hooked to the negative lead of the battery when they are wired in parallel.
After that, as shown in the wiring diagram, we wire the negative terminal of one panel to the positive terminal of another panel in a series connection.
Our article on RV solar panels is recommended reading if you want to understand more about series and parallel connections.
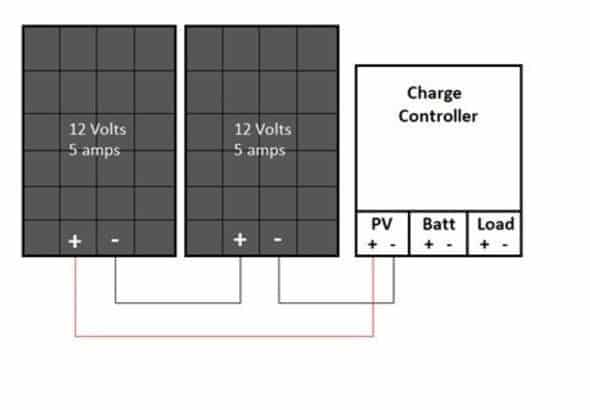
Step 2: Join the Battery Bank and Charge Controller.
The battery lines need to be connected to the charge regulator once the solar panels have been wired together.
The charge controller, which connects the batteries and RV solar kits/panels, is a crucial part of the solar system.
To prevent a rapid surge from harming the controller, it is always advisable to connect the battery and the controller.
Wires from the positive and negative battery terminals should be inserted into the input ports on the controller that are designated for batteries in order to connect a solar power battery to it.
After that, use a screwdriver to tighten the screws to guarantee that the wires are securely fastened.
Caution: Pay close attention to the positive and negative cables and double check that they are connected to the correct ports.
A bad connection might short out your battery or charge regulator.
Step 3: Connect The Controller To The RV Solar Panels
MC4 connections are specialized connectors used for connecting RV solar panels to the controller.
There are male and female sides to these long, cylindrical fittings.
You will need to manually link your solar panels to the wires if they don’t fit with them.
MC4 connections are commonly accessible at your neighborhood electrical shop or online.
Simple instructions on how to connect them to the wires have to be included with them.
The cable that is typically connected to an RV solar panel is not long enough to reach the controller.
Because the controller should be maintained close to the batteries, you’ll need to manually measure the length of cable needed for the connection.
The male and female connections must be matched up and snapped into position once the input wires have been connected.
The connections are firmly installed when they make a “click” noise.
Step 4: Verify That All Connections Are Operational By Checking Them Again.
After completing the wiring, you must validate that the system is functioning properly.
The majority of charge controllers include digital panels that display how much current is going to the battery.
To confirm that everything is connected properly, check the reading on the display.
As soon as the RV battery is completely charged, keep it connected.
The size of the battery, the wattage of the solar panel, the quantity of electricity used, and the amount of sunshine will all affect how long it takes to completely charge the battery.
Your RV solar system is now prepared to power the DC-powered appliances in your RV.
You must take an extra step to connect an inverter to the line in order to use AC-powered equipment.
Step 5: Connect A Solar Inverter To The Battery
The basic objective is to convert the DC electricity from the solar panels to 110V AC power, or to “invert” it, so that your RV can utilize it.
The RV batteries should next be connected to the solar inverter’s lugs and then to the AC appliances.
Once everything is set up, you may turn on all of your electronics, including the microwave, TV, and refrigerator in the RV.
Not only is understanding appropriate wiring essential, but it’s also important to be well-versed on the elements of an RV solar power system.
In the part that follows, we go through solar controllers and lead-acid batteries and how they function so that you can fully comprehend the solar power arrangement.
Solar Charge Regulator
A component called a solar charge controller, or regulator, is placed between the battery pack and the RV solar panel.
It manages the charge transfer to the solar-powered battery and prevents the battery from overcharging.
Most 100 watt solar panels rated for 12 volts output between 16 and 20 volts, which may harm a battery if a battery monitor is not present when the battery is being charged.
There are two different sorts of solar regulators you may use if you’re seeking to live fully off the grid:
#1. Charge Controller with PWM
The most common form of solar regulator on the market is a Pulse Width Modulation (PWM) controller.
It is less complicated and costly than MPPT controllers.
When the RV battery is getting close to being fully charged, the PWM controller progressively reduces the amount of charge pouring into the battery.
To keep the battery charged, the PWM controller keeps the system in a “trickle” condition.
#2. Charge Control MPPT
A more sophisticated and pricey alternative to the solar charge regulator is the Maximum Power Point Tracking (MPPT) regulator.
In contrast, it reduces the charge flowing to the solar cells as they get close to full capacity and provides the same switch-like protection as a PWM.
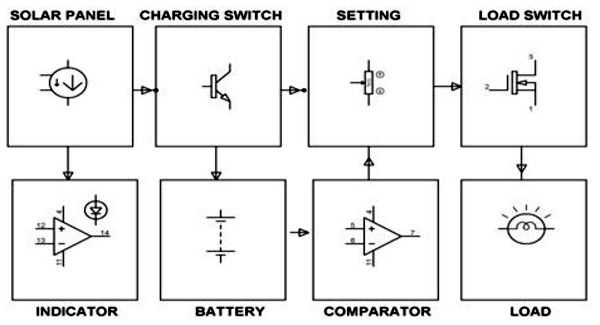
#3. The Operation of Solar Charge Controllers
Through the use of a group of operational amplifiers, solar charge controllers manage panel voltage and load current.
They use a Comparator to detect the battery’s condition, and LEDs are used to display it.
To signal undercharging, overcharging, and deep discharge situations, the controller employs a series of LEDs.
According to the wiring schematic, the controller utilizes a metal-oxide semiconductor field-effect transistor (MOSFET) as a semiconductor switch to avoid overcharging.
When the battery is full, the transistor bypasses the extra power from the solar panel system to a false load.
Lithium-Ion Battery
The lead-acid battery was the first rechargeable battery commercially accessible for commercial use and was created in 1859.
It is now the battery that is most often used, and there are valid reasons for this.
First, compared to other kinds of batteries, it is trustworthy and more affordable on a per-watt basis.
The fundamental operation of the battery has not altered over time, despite modifications to the production process and advancements in the material.
Basics of Lead-Acid Batteries – How Do They Function?
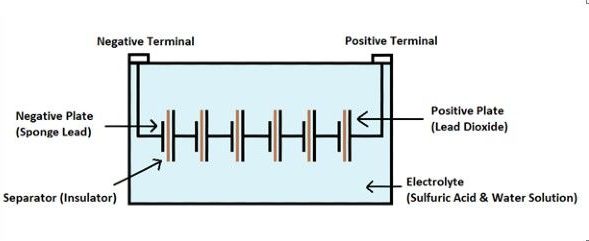
Examining the lead-acid battery’s components is crucial to comprehend how it operates.
The battery’s single cell has the following four components:
- A lead dioxide-coated positive plate
- A lead sponge-based negative plate
- Between the two plates, a separator (insulating material)
- An electrolyte made of sulfuric acid and water
The plastic container that houses these components serves to hold the battery together.
Several cells are often arranged in series within the container to make up the total battery.
Only after the lead-acid battery is charged can it create voltage.
The solar panels in RV solar configurations provide that charge via the charge regulator.
The dimensions of the positive and negative plates as well as the battery’s electrolyte content affect how much charge a battery can hold.
The lead-acid battery’s amp-hour (Ah) rating is used to represent this storage capacity.
A battery will live longer for a given load if its amp hours are greater.
Lead-Acid Battery Types
The lead-acid battery comes in two primary kinds and three subtypes.
The two primary kinds consist of:
- Starting Battery: The starting battery, also known as the cranking battery, is perfect for starting engines since it provides short bursts of energy. Additionally, their plate numbers are higher and their composition is thinner.
- Deep Cycle Battery: The deep cycle battery promises long-term energy supply but has lower immediate voltage and current. They may last longer than starter batteries and have thicker plates. Enough power is provided by deep cycle batteries for marine and RV applications.
There are three variations of the lead-acid battery in addition to the primary ones.
Which are:
- Wet Cell Battery: The charge is stored in a liquid electrolyte called a “wet cell,” which may be sulfuric acid. They are often employed in areas like as energy storage, aviation, and electric utilities. Dry cell batteries, such alkaline or lithium batteries, are becoming more and more well-liked, nevertheless.
- AGM Battery: The electrolyte is stored in a glass mat separator found within AGM batteries. They have an extremely low self-discharge rate and need no maintenance. They are used to run generators, UPS, boats, RVs, and more.
- Gel Cell Battery: Because it has an electrolyte that has been gelled, the gel battery is comparable to the AGM battery. These batteries lessen the evaporation and spilling of electrolyte that are frequent problems with wet cell batteries.
Visit our best rechargeable battery guide to learn more about batteries for solar applications.
You may also see this video, which outlines the easy procedures for installing RV solar.
Final Reflections
Even while connecting a solar system may not be the most difficult step in the installation process, it is still a crucial one.
To connect solar panels to RV batteries, follow the detailed instructions in this thread.
Double-check all the wiring.
If you still have questions, please post them in the comments section since you can never be too cautious when it comes to electricity.