I’ve learned a lot about solar by analyzing WHAT others have done, as well as via some trial and error.
So let me take you inside our Class C motorhome’s DIY off-grid electricity system.
I hope it gives you some useful insights.
Because it is tailored to our requirements and camping style, the solar system I built performs effectively.
RV solar solutions don’t come in a one-size-fits-all format.
Your requirements will vary from ours.
If you want to add solar to your RV, I advise you to study as much as you can ahead of time.
You’ll be prepared to decide on the components that are best for you when the time comes to start building your own system.
Components Of An Off-Grid System
Our off-grid system’s main parts are typical of most off-grid systems.
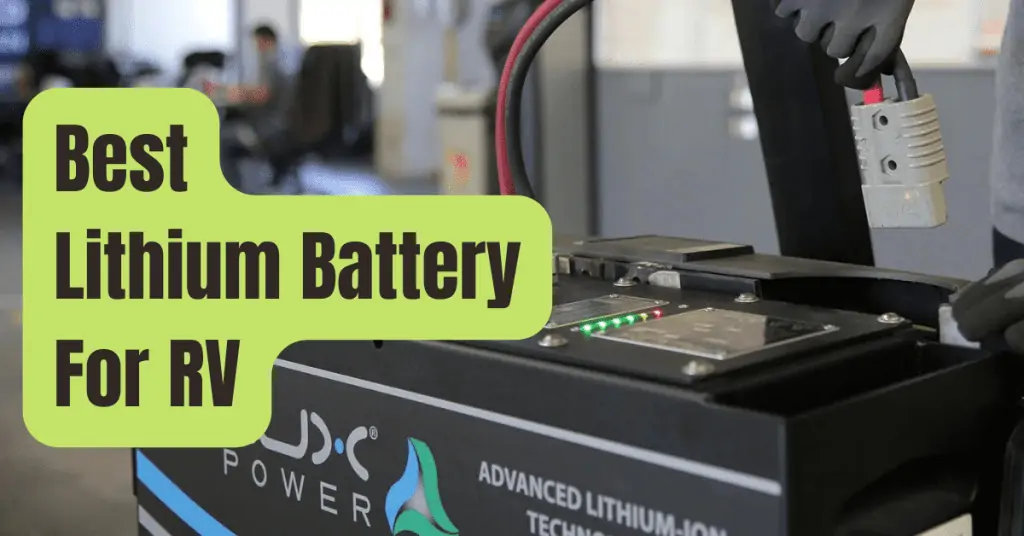
- Battery Bank – 400 Amp Hour Lithium (LiFePO4) Deep Cycle Batteries (4 x 12 Volt Batteries)
- Power Inverter – 2000 Watt Pure Sine Inverter by Samlex
- Monitor for Batteries – Simarine PICO Battery Monitoring System
- Solar Panels – 1000 Watts of Semi-Flexible Solar Panels mounted on the roof and 230 Watts of portable solar panels (ground deployed as needed)
- Solar Charge Controllers – MPPT Solar Charge Controllers from Victron
The only ways in which our system and a basic system are different are the number, size, model, and connections between components.
The many auxiliary parts, such as cables, connections, fuses, and switches, that assemble everything into a functional system are not specified.
Here is a schematic of our setup that shows the connections between the solar and battery charging parts.

#1. How The System’s Solar And Battery Charging Components Operate
At the system’s core, a large lithium battery bank powers our lights, sensors, and other DC-powered devices using 12 volts DC.
Additionally, it runs our power inverter, which converts the DC electricity within the RV into home AC power.
This video demonstrates the mounting and wiring I did to connect our four 12 volt lithium (LiFePO4) Battle Born batteries in parallel for a 400 amp-hour capacity.
I had four six volt AGM batteries linked in series and parallel to provide 450 Amp Hours of capacity before switching to lithium batteries.
You may learn how to build such connections from this article.
Our battery bank’s energy flow is monitored by the Simarine PICO Battery Monitoring System (BMS), which also tells us how much energy is available at any given moment.
Sunlight is captured by solar panels on the roof throughout the day.
Multiple Victron MPPT solar charge controllers receive this energy and manage it so that it may safely and effectively charge the batteries.
#2. What a 24-Hour Boondocking Cycle Is Like
When boondocking, we often use between 10 and 30 percent of the battery’s capacity to run our devices, watch movies, and use our electric kitchen appliances.
The battery bank is often fully recharged from solar power by midday the following day.
Once the batteries are completely charged, we detest squandering free solar energy.
Therefore, we attempt to utilise the available solar power before evening when the sun is still shining.
The power we need for the remainder of the day and night is provided by our completely charged batteries at sunset.
The cycle repeats every day.
Our battery bank will endure a deeper depletion on cloudy days while still absorbing some solar energy.
Now, lithium batteries provide us with greater power in reserve.
As a result, if required, we may discharge them all the way down to 10–20 percent of their capacity.
In order to save energy, we have designed our lithium battery bank to last for many days in the event that solar power is insufficient.
Are you new to camping in an RV? This page is a fantastic location to learn how: How to Boondocking in an RV
#3. Using an Inverter to Supply AC Power to Your Home
Our Samlex 2000 watt pure-sine inverter converts 12 volt DC electricity to 120 volt AC power as part of its function.
All of the RV’s AC circuits and domestic outlets are powered by the inverter’s AC power, which replicates a shore power connection.
When my wife was allowed to use her blow dryer, the situation completely changed.
Yes.
After that, I became a hero.
A power inverter installation gives the impression that you are connected to a power source.
We are able to run almost everything on our huge battery bank instead of a shore power connection.
We often use our Keurig coffee machine, induction burner, and microwave.
Even with the addition of lithium batteries, we can now run our air conditioner and hot water heater for brief intervals.
I convert our refrigerator from gas to electric periodically during the day.
Until I convert it back to LP at night, it operates on the inverter and batteries.
This graphic demonstrates how our inverter connects to the electrical system of our RV.
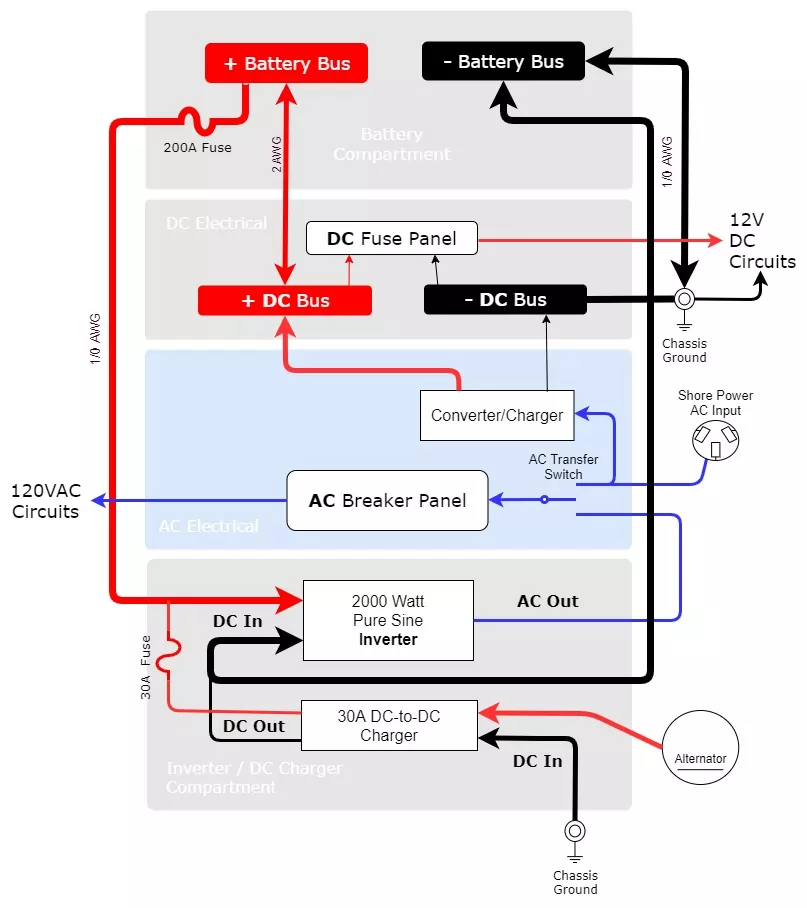
Important: When Using The Inverter, Disconnect The Converter And Charger.
When using inverter power, the converter/charger has to be turned off.
This is why.
The batteries would be charging themselves via the inverter and converter/charger if the converter/charger (which converts AC back to DC and charges the batteries from shore power) wasn’t disconnected.
This situation is not secure.
To address this issue, the converter/power charger’s is connected to the automatic transfer switch’s shore power side (ATS).
With this configuration, battery charging is only possible while using shore power (not inverter power).
Remember that bigger RVs with integrated inverters, chargers, and transfer switches do not have this problem.
These are often referred to as hybrid inverters.
#4. How to Drive While Charging Batteries from the Alternator
Our motorhome’s engine can also sometimes recharge our deep-cycle batteries.
In order to safeguard my alternator from high current draw and make sure the batteries are charged appropriately, I first fitted a 20 Amp Renogy DC-to-DC charger between the alternator and battery bank.
Later, I switched to a Victron Orion 30A DC-DC Smart charger, which has additional programmability and Bluetooth and battery safety capabilities, to replace it.
I’ll demonstrate the alternator charging mechanism for my Battleborn lithium batteries in this video.
Note: Since I removed my onboard generator, alternator charging has become my backup method for replenishing my battery bank.
#5. The Importance of a Battery Monitoring System
Our deep cycle batteries need to be charged, which is the main reason we have solar in the first place.
I wouldn’t know how much power I’m consuming in the RV or how much battery capacity is left if I didn’t have a battery monitoring device.
A battery monitoring system need to be a part of any off-grid setup (with or without solar).
It ought to be the first installation.
My SIMARINE PICO Battery Monitor System in our RV makes it extremely simple to track energy use and the battery bank’s level of charge.
Real-time visualization makes it evident how much energy is flowing into and leaving the batteries.
This brand-new addition to my system is very great.
This image shows the PICO touch screen.

SIMARINE wishes to discount your PICO system by 5% for you.
Recently, battery monitors have undergone significant change.
Here is a list of the best RV Battery Monitors for 2021 to aid in your decision-making.
Some essential things I look for right now are Bluetooth, WiFi, and remote mobile access.
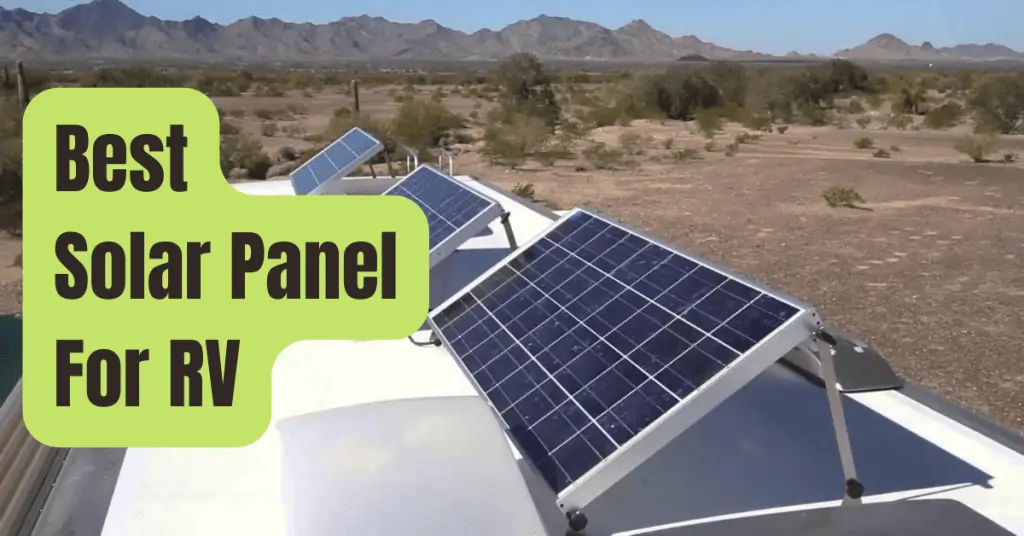
Solar Panels For RVs
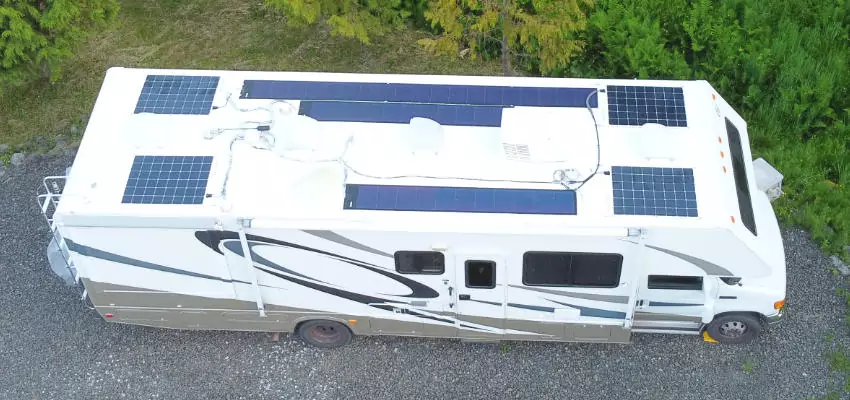
On the roof of my RV, I have two different kinds of flexible solar panels installed: some older Unisolar thin-film solar panels and semi-flexible monocrystalline solar panels.
Over the years, as my system has grown, I have kept the Unisolar panels in place.
Each area of my RV roof is covered by three arrays.
The use of many parallel arrays increases productivity.
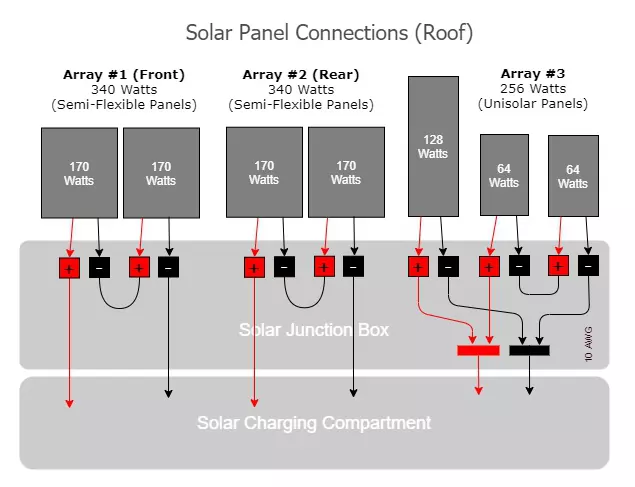
On the front and back of the roof are put SUNPOWER flexible solar panels.
Each pair of 170 watt panels has a separate Victron solar charge controller and is connected in series.
My parallel controller arrangement is very effective and efficient because to Victron’s built-in charge controller synchronization feature.
The thin-film flexible solar panels from Unisolar were set up in 2012.
They were the only flexible solar panels on the market at the time.
One 128 watt panel and two 64 watt panels are present.
The two smaller panels are linked in series with the 128 watt panel, which is linked in parallel with the smaller panels.
Unisolar filed for bankruptcy a long time ago.
It’s a shame.
They offered a superb product.
But even after all these years, the Unisolar panels I placed are still functioning perfectly.
The only drawback is that they need more room.
In this picture, you can notice the difference (below).
Around 70% of the total output of the three thin UNISOLAR panels may be produced by a single rectangular monocrystalline SUNPOWER flexible panel.
I can securely walk on the UNISOLAR panels, unlike the monocrystalline solar panels.
Given the restricted space up there, that is a major bonus.
Why do you still use semi-flexible solar panels is a common question.
Due to its low-profile design and small weight, flexible solar panels continue to be a favorite of mine.
Additionally, they often produce more electricity than similar conventional glass panels.
I appreciate that you couldn’t tell by looking at my RV that the roof is covered with 1000 watts of solar power.
I’ll keep experimenting with flexible solar panels and let you know how they turn out when I find out.
To be informed about changes and best practices relating to RV Solar Panels, get my FREE Solar Panel Guide and join my solar insiders email list.
I’ll be sending out updates often.
#1. On The RV, How We Mounted Flexible Solar Panels
I’m always testing out new methods of installing flexible solar panels.
My most recent method features a track system for simple installation and removal of the solar panel and doesn’t involve drilling any holes in your roof.
In this video, you can see my most recent mounting setup, which is still holding up well after a few thousand miles of use.
#2. Solar Panel Wiring Simplified with Junction/Combiner Box
All of the connections for the solar panels are concealed and secured in a junction box on the RV roof.
Direct wiring connects every solar panel to this junction box.
These terminal blocks enable me to join solar panels in series and divide my panels into two different solar arrays, in contrast to a normal solar combiner box used to link solar panels in parallel.
I won’t need to relocate anything or run any new wires if I decide to modify my layout in the future.
After putting in the junction box, I got rid of all the cable “T” connections and MC3 to MC4 converters (see video below).
Now that every connection has been established within the box.
This video demonstrates how I constructed and connected the Solar Junction Box.
#3. Why Use Several MPPT Solar Charge Controllers?
On the roof, there are several solar arrays.
Each solar array has a separate Victron MPPT solar charge controller that is specifically intended for it.
My portable solar panels, which I put up on the ground as required, have their own Victron 100/20 MPPT charge controller.
For charging my lithium battery bank, all solar charge controllers are connected in parallel and use the same charge profile.
The installation of my MPPT solar charge controllers in parallel to charge my battery bank is explained in this video.
#4. Full System Walkthrough: How Everything Interrelates
As you can see, a variety of system parts work together to give our RV with off-grid electricity.
As you examine our configuration, having a clear understanding of HOW and WHY I designed our system will hopefully be helpful.
Watch the video below to see our full system in action for a few minutes.
Remember that since shooting this video, I’ve added additional solar panels, updated to lithium batteries, and built a DC-to-DC battery charger.