One benefit of RV camping is that you may remain warm and comfortable even when the outside temperature falls below freezing.
We provided advice on effective cold-weather camping techniques in a previous article on RVing in the winter.
But because of how brief our stay was, we were able to omit several processes.
Extended winter RV camping necessitates some extra adjustments to your standard setup.
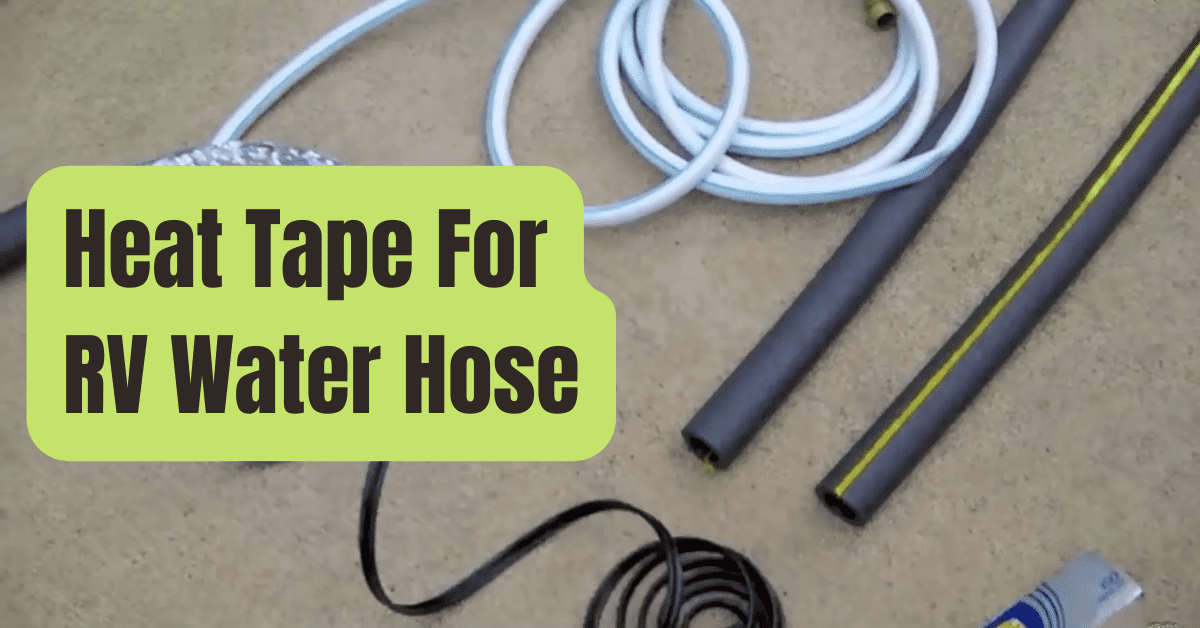
Knowing how to utilize heat tape for your RV water hose can come in handy while traveling in below-freezing temps for any period of time.
Why Is Heat Tape Required for an RV Water Hose?
RVing in below-freezing conditions is possible without experiencing a plumbing emergency by using heat tape on your water hose.
Your water hose won’t freeze even in the cold because of the additional heat the heat tape provides.
In this manner, no matter how chilly it gets or how long you stay at the RV park, you may always have access to on-demand water.
Is Heat Tape Required for Every RV Water Hose?
No.
Others decide to withstand the cold instead of storing their RVs for the winter or moving south to warmer climates.
Use heat tape on your RV water hose if you camp in cold climates and need to maintain a constant flow of municipal water.
This will prevent your hose from freezing into a solid tube.
You won’t be able to get water into your RV from the RV park water hookup if your hose freezes.
In certain instances, this may even result in damage to your RV’s spigot, pressure regulator, or both.
How to Make Your Own Heated RV Water Hose Using Heat Tape
We should first point out that heated RV water hoses are available in stores and online.
But generally speaking, it will cost more, often a lot more.
The cost of heated hoses might be high.
But as a do-it-yourself project, you may create your own hot water hose using heat tape.
In the first part of our film titled “How To RV In The Winter,” we demonstrated how we accomplished it.
However the detailed instructions are provided in the following paragraphs.
requisites for using heat tape on your RV water hose.
DIY Project: Insulating Your RV Water Hose Using Heat Tape
You may securely RV in the winter without worrying about your water supply being cut off by freezing temperatures by using heat tape on your RV water line.
Materials Required
The supplies you’ll need to create your own heated RV water hose using heat tape are listed below:
- Safe-Water-To-Drink Hose
- Metallic Aluminum
- Proper Electric Heat Tape of the Right Length
- Split foam tubes for insulating
- Sticky tape
- Heat-Sealing Insulated Tape (might also be needed)
- Robust extension cord (if needed)
Once you have everything you need, just follow our step-by-step instructions to safely heat your RV water hose using heat tape.
#1. Wrap The Length Of The Hose With Aluminum Foil
Wrapping an RV drinking water hose with aluminum foil is the first step in applying heat tape for your water hose.
When you’re done, the aluminum foil ought to fit the hose snugly.
Instead of having the heat concentrate on one side of the water hose and maybe cause it to melt, the aluminum foil distributes the heat evenly all the way around the line.
NOTE: Not everyone considers this step to be necessary, and many claim to have survived freezing weather by just wrapping the heat tape in a slack coil along the length of the hose.
However, we believe that the foil wrap step greatly helps in maintaining a more uniform distribution of heat from the heat tape around the RV water line.
Be careful not to overlap the heat tape when you wrap it around the hose since doing so might create a hot spot that harms the heat tape.
#2. Fill The Split Foam Tube With The RV Water Hose And Heat Tape.
In a divided foam tube, place your aluminum-wrapped hose next.
These tubes are available in the plumbing department of a hardware or home improvement shop.
They come in various sizes, so just be sure you get one with a 1 to 1.5 inch inner diameter aperture big enough to suit your water line.
Hose that has been heat-sealed and nestled within a foam tube.
Include the heat tape beside the hose as you insert it into the split foam insulation.
The heat tape should be slipped into the foam tube with the water hose in a straight line.
Along the whole length of the hose wrapped in foil, place the heat tape.
Make sure the heat tape extends the whole length of the hose, including the section of the line that will enter the RV and finish up within the water compartment, if your RV has a dedicated water compartment.
Additionally, make sure that a portion of the heat tape extends beyond the water hose’s connection to the faucet.
This will enable you to cover the campsite spigot with heat tape as well, protecting it from freezing as the weather drops.
#3. Use Duct Tape To Seal Any Seams.
Use duct tape to seal the seams if your hose requires many foam tubes to span its whole length, as it most certainly will.
The seams where the different foam tube portions converge may be sealed using duct tape.
This stops the various foam tubes from separating or slipping off of your hose.
You’ll still need to tape the lengths of tubing together where the ends meet to create one continuous, unbroken insulated tube along the length of the water hose, even though the split foam tubes came with adhesive strips aligned along the split, making duct tape unnecessary to close the tube around the hose.
#4. Use More Heat Tape On The Water Faucet.
The next step is to cover the water spigot with the length of heat tape you left hanging over the house’s end.
To prevent the water within the faucet from freezing, wrap the spigot and then insulate it with a section of the foam insulating tube.
#5. Wrap The Exposed Spigot/Pipe And The Faucet With Heat Tape If Necessary.
Although certain portions of the spigot will probably be too wide to be covered by your foam tubes, you still need to insulate them to prevent freezing.
You have two options for these locations.
- You may cover the faucet and any exposed parts of the spigot with electric heat tape if it extends beyond the end of the foam tube (as intended).
- The alternative is to cover these regions with insulated heat wrap tape that is separate. In this instance, you would fully cover any exposed areas by wrapping the insulated heat wrap tape over the exposed spigot and faucet.
In any case, your aim is to make sure that no fresh water piping is left out in the weather or cold.
To prevent it from freezing, you should maintain the whole pathway from the ground up to the water compartment of your RV warm and insulated.
#6. Check Your Work, Triple-Check All Insulation & Heat Tape
Examine every section of the work before you complete.
For instance, you should check the full length of the hose and the spigot to make sure that you have properly insulated everything with foam and heat tape.
Additionally, you must guarantee that the spigot is completely insulated from the ground to the hose.
The water control knob should be the sole component that is left visible so that you may reach it if/when necessary.
Here, the spigot was wrapped with insulated heat wrap tape to keep it warm.
Only the on/off switch is visible (the two power lines are still attached).
One for the heat tape wrap for the spigot and the other for the heat tape for the RV water line)
Additionally, you should plug in your heat tape using a high-quality, heavy-duty extension cable that is guaranteed not to crack or break at low temperatures.
It’s important to note that the majority of heat tape includes a thermostat that will turn it on automatically when the temperature falls below around 40 to 45 degrees, saving you from wasting energy by heating things up when there is no chance that they would freeze.
Fill your fresh water tank up last.
So, even if your water hose were to briefly freeze, you would still have access to water for a few days while you waited for the temperature to increase.
Conclusion
RVing is still a viable option throughout the winter.
You may even like how much less busy the parks will be.
You may go outside and take part in your preferred wintertime activities, then return to your warm, cozy RV.
The water hose on your RV has to be protected if you plan to camp in subfreezing conditions for any length of time.
Use heat tape for your RV water hose to achieve this on a budget by following our clear instructions.
Of course, you may read this post if you’d rather NOT do this yourself and would rather purchase a professionally produced heated RV water hose: Options for Heated RV Water Hose
Check out our first article on how to RV in the winter for further advice, and browse through all of our entries on winter RVing here.