For every solar installation, understanding solar panel wiring, also known as stringing, and how to link solar panels together is essential.
Understanding how alternative stringing configurations affect a solar array’s voltage, current, and power can help you choose a suitable inverter for the array and ensure that the system will work as intended.
The odds are against us.
The maximum output of the inverter will restrict your array’s voltage’s ability to produce power, which may also shorten the inverter’s lifespan depending on how much.
The system will also generate less if the array voltage is too low for the inverter you’ve selected, since the inverter won’t start up until its “start voltage” is achieved.
Additionally, if you neglect to consider how the shade may alter system voltage during the day, this may also occur.
Fortunately, sophisticated solar software can handle this intricacy on your behalf.
For instance, Aurora can string the system for you or automatically tell you if the length of your strings is appropriate.
With Aurora’s auto-stringing capability, you may virtually string solar panels if you’re seeking for a dependable and simple approach to plan out your solar arrangement.
However, it’s still crucial for a solar specialist to comprehend the guidelines for string size.
Although we won’t go into all the specifics of solar panel wiring in this post, we hope that it will provide you a general overview of some of the most important ideas, whether you’re new to the field and studying the fundamentals of solar design or simply need a refresher.
In this post, we’ll go over the fundamentals of solar panel stringing in systems with string inverters and how to calculate the optimal number of solar panels per string.
We also go through several stringing alternatives, including series and parallel connections for solar panels.
The Most Important Electrical Terms for Solar Panel Wiring
Understanding a few basic electrical concepts, notably the relationships between voltage, current, and power, is important to comprehend the laws of solar panel wiring.
An example that might help you grasp these ideas is to imagine electricity as water in a tank.
As seen in the illustration below, a greater water level is like a higher voltage in that there is more potential for anything to happen (such as current or water flow).
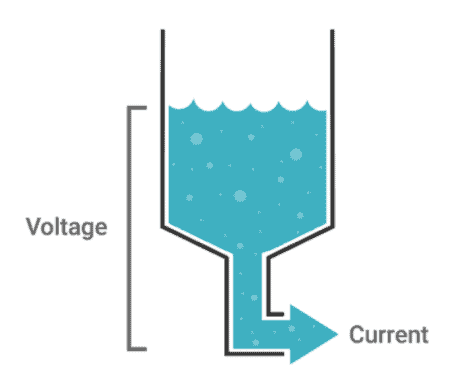
#1. Voltage: What Is It?
The difference in electrical charge between two points in a circuit is known as voltage, abbreviated as V and measured in volts.
This disparity in charge is what makes electricity move.
The potential energy, or the maximum amount of energy that might be released, is measured by voltage.
Numerous variables influence the voltage of a solar array.
The first factor is the array’s exposure to sunlight (irradiance).
As one may anticipate, the voltage will increase as the amount of irradiance on the panels increases.
Voltage is also impacted by temperature.
The quantity of energy a panel generates decreases as the temperature rises (see our discussion of Temperature Coefficients for a more detailed discussion of this).
A solar array’s voltage may be substantially greater than usual on a cold, bright day whereas it may be significantly lower on a hot day.
#2. How Do Electrical Currents Work?
The rate at which the charge is flowing is known as electric current, or “I” in equations.
The water exiting the tank via the pipe in the previous illustration is equivalent to an electrical circuit’s current.
Amps are used to measure electric current (short for amperes).
#3. What Exactly Is Electricity?
The pace at which energy is transported is called power (P).
It is measured in Watts and equal to voltage times current (V*I = P) (W).
In solar PV systems, the inverter plays a crucial role in maximizing the power output of the array by adjusting the current and voltage in addition to converting DC electricity from the solar array to AC power for usage in the house and on the grid.
Check out our article on Maximum Power Point Tracking for a more in-depth discussion of how current, voltage, and power interact in the context of a solar PV system (MPPT).
In it, we go through power-voltage curves and current-voltage (IV) curves, which illustrate how the panel output current fluctuates with panel output voltage (which show how panel output power varies with panel output voltage).
These curves provide information about the voltage and current combination(s) that optimize power production.
Simple Solar Panel Wiring Concepts (aka Stringing)
In order for a solar PV system to work, the panels must be wired together to form an electrical circuit through which current can flow.
Additionally, the panels must be wired to the inverter, which transforms the DC power generated by the panels into AC power that can be used in your home and transmitted to the grid.
In the solar energy sector.
This is known as “stringing,” and a string is a collection of panels that have been joined together.
We’ll be concentrating on string inverters in this essay (as opposed to microinverters).
There is a range of voltages that each string inverter can function at.
#1. Stringing in Series vs. Parallel
There are various strategies for wiring solar panels.
Understanding the difference between connecting solar panels in parallel and series is important.
These varied stringing arrangements have distinct impacts on the electrical current and voltage in the circuit.
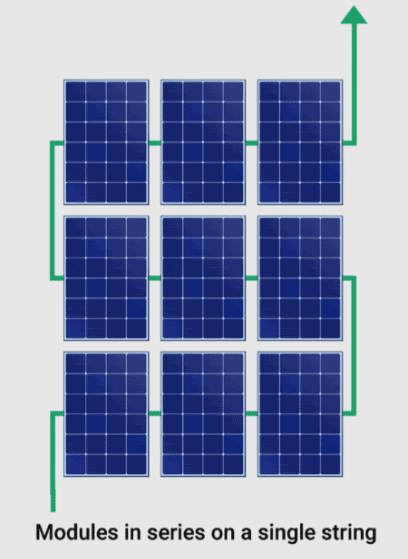
#2. Connecting Solar Panels in Series
Stringing solar panels in series means connecting one panel to the next in a line (as seen in the left side of the picture above) (as illustrated in the left side of the diagram above).
Just like a regular battery that you may be acquainted with, solar panels contain positive and negative terminals.
When connecting solar panels in series, the wire from one panel’s positive terminal is linked to the next panel’s negative terminal, and so on.
Each new panel added to a series of panels increases the string’s overall voltage (V), while the current (I) in the string stays constant.
The fact that a darkened panel might limit the current flowing across the whole string is a disadvantage of stringing in series.
The current is decreased to that of the panel with the lowest current since the current is constant across the whole string.
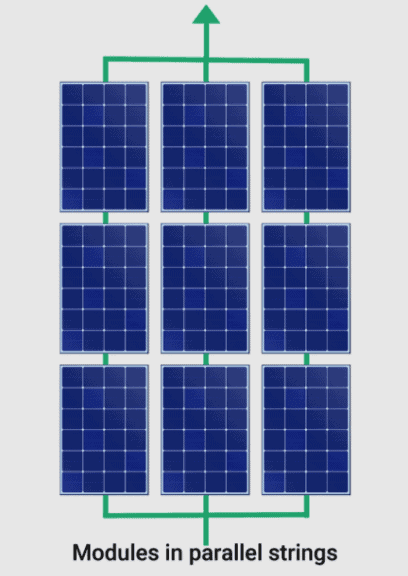
#3. Parallel Solar Panel Connectivity
It is a little trickier to connect solar panels in parallel, as indicated on the right side of the above picture.
When stringing in parallel, the positive terminals of all the panels on the string are linked to one wire, and the negative terminals are all connected to another wire, as opposed to connecting the positive terminal of one panel to the negative terminal of the next.
The current (amperage) of the circuit grows when more panels are added when panels are connected in parallel, but the voltage of the circuit doesn’t change (equivalent to the voltage of each panel).
As a result, an advantage of stringing in parallel is that the current of the whole string won’t be decreased if one panel is significantly shadowed while the rest of the panels may continue to work properly.
You Need Information to Determine How to String Solar Panels
Before you can decide how to string your solar array, you need to know a few crucial details regarding your inverter and solar panels.
#1. Information about Inverters
The following inverter specs must be understood (you may find them in the product’s manufacturer datasheet):
- Maximum DC input voltage: The highest voltage an inverter can accept
- The voltage required for the inverter to function, often known as the “Start” voltage (Vinput, min).
- How much energy the inverter can take before failing, or Maximum Input Current
- Does it have any Maximum Power Point Trackers (MPPTs)?
#2. How do MPPTs Work?
The maximization of power production when the climatic conditions on the panels change is one of the functions of inverters, as was mentioned before.
Through the use of Maximum Power Point Trackers (MPPTs), which pinpoint the current and voltage levels where power is maximized, they do this.
To avoid lower efficiency, the conditions on the panels for a particular MPPT must remain mostly constant (for instance, differences in shade levels or the orientation of the panels).
Additionally, it’s vital to keep in mind that if the inverter has numerous MPPTs, strings of panels with various conditions may be linked to each MPPT separately.
#3. Information About Solar Panels
You will also need the following details on your chosen panels in addition to the information about your chosen inverter mentioned above:
- The greatest voltage that a panel may generate while it is not loaded is known as open circuit voltage (Voc).
- Although we won’t go into current calculations in this post, short circuit current (Isc) is the current flowing through the cell when the voltage is zero.
Understanding that these figures are based on the module’s performance under what are known as Standard Test Conditions is crucial (STC).
STC comprises a temperature of 25 degrees Celsius (about 77 degrees F) and an irradiation of 1000W per square meter.
However, the actual circumstances a PV system encounters in the real world might be substantially different from those in the lab, which ensures consistency in testing.
As a consequence, there may be large differences between these numbers and the real current and voltage of the panels.
In order to make sure that your string lengths are suitable for the circumstances the PV system will meet, as we’ll detail below, you’ll need to modify your calculations depending on the anticipated lowest and maximum temperatures where the panels will be mounted.
Basic Instructions for Stringing Solar Panels
#1. Verify That The Inverter’s Minimum And Maximum Voltages Are Within The Range.
Never allow the inverter’s maximum input voltage or current, or its minimum/start voltage, to be exceeded or reached by the strings you are connecting to it.
Verify that the maximum voltage complies with the design area’s code requirements.
The National Electrical Code in the US limits the highest permissible voltage for the majority of residential systems to 600V.
Higher voltages are permitted in Europe.
Pro: Using STC values alone to determine voltage range is not advised.
We are aware that whereas current is additive in parallel strings, voltage is additive in series strings.
As such, you may intuitively think that you can estimate the voltage of our suggested PV system design and if it fits within the acceptable range for the inverter by multiplying the voltage of the panels by the number in a series string.
You may alternatively suppose that you could compute the current of the system by summing the current of each parallel string
As we previously established, the actual voltage of the panels in real-world circumstances may be significantly different since STC numbers only represent the performance of the modules under highly precise circumstances.
As a result, the simplified calculations based on STC values only provide you with a first approximate estimate; you also need to take into consideration how the voltage of the system will fluctuate depending on the possible temperatures it may encounter in the installation region.
The voltage of the system may be much greater or lower depending on the outside temperature.
It will need a more complex formula, like the ones below, to guarantee that the temperature-adjusted string voltage is inside the input voltage window of the inverter:

Don’t worry if these equations seem to be a bit of nonsense; Aurora solar design software conducts these calculations automatically and notifies you as you create whether your string lengths are too long or too short given the anticipated site temperatures.
(For further details about stringing in Aurora, visit this page in the help center.)
In order to guarantee that the system will work as planned and not contravene any regulations or equipment specifications, Aurora additionally conducts a number of additional validations.
This may help to avoid expensive performance concerns.
(Check out this article in our help center for a comprehensive discussion of these validations.)
A PV System That Is Functioning Poorly
Read our examination of a poorly performing system in Cathedral City, California for an illustration of why it is crucial to precisely account for how environmental factors will affect the voltage of your PV system.
In one instance, a solar designer made a mistake by failing to take shadow into account, which regularly caused the system to fall below the inverter’s start voltage and produce substantially less electricity than anticipated.
#2. Make Sure The Conditions Of All The Strings Are Similar, Or Connect Strings With Various Conditions To Several MPPT Ports.
The strings must have the same conditions (such as the same azimuth/orientation, tilt, and irradiance) if they are linked to the same inverter MPPT, after you have confirmed that your strings are the appropriate lengths for the inverter specs.
The efficiency and power production of your solar design will be reduced by inconsistencies in the conditions on the strings.
The fourth article in our PV system losses series, Tilt & Orientation, Incident Angle Modifier, Environmental Conditions, and Inverter Losses & Clipping, discusses the reasons why errors in shading, orientation, or azimuth lead to decreased power production.
The panels with varied conditions may be divided into their own strings and connected to different MPPTs of the inverter if you are planning for a location where it is important to have panels on multiple roof faces or certain portions of the array will get more shadow than others (provided your chosen inverter has more than one MPPT).
The inverter will be able to guarantee that each string functions at the moment where it generates the most power thanks to this.
#3. Additional Ideas to Improve Your Design
The aforementioned guidelines will guarantee that your stringing arrangement complies with your inverter’s requirements and that inconsistencies in the panel conditions won’t have a detrimental impact on the system’s ability to produce electricity.
To come up with the best design, a solar designer might take into account extra elements (that is, the design that maximizes energy production while minimizing cost).
Inverter clipping, the usage of module-level power electronics (MLPE), which includes microinverters and DC optimizers, and the design efficiency offered by software tools are some of these considerations.
Switcher Clipping
Sometimes it may be advantageous to connect a larger solar array to the inverter, resulting in a theoretical maximum voltage that is only a little bit greater than the inverter max.
Due to the increased number of panels, your system may be able to create more energy when the inverter’s maximum voltage is reached, at the expense of lower (“clipped”) output when the array’s DC voltage is higher.
You can create more power without spending extra money on a second inverter or one with a higher voltage rating if the production benefits outweigh the production loss due to inverter clipping.
Naturally, this choice should be carefully considered, along with the amount of output that will be lost vs the amount of extra production that will be obtained at other times.
To help you decide if this makes sense, Aurora includes a system loss graphic that shows how much energy will be wasted due to clipping.
See our blog post on the topic for a thorough discussion of inverter clipping and when a system with it makes sense.
Microinverters
There are several types of inverters than string inverters.
Each panel may run at its maximum power point independent of the circumstances on other panels thanks to microinverters, which are inverters that are linked to each individual panel (or pair of panels).
One should not bother about making sure the conditions of panels on the same string in this configuration.
Future panel additions may be made simpler by microinverters.
Investigate a Few Alternatives to Discover the Best One
As you can see, there are a lot of factors to take into account while stringing your panels and determining the optimal inverter and stringing arrangement for the client.
Consider a few alternative possibilities since you may not come up with the best design the first time.
However, for this to be effective, you’ll need a method that allows for fast comparison of several designs.
Solar software, such as Aurora, may be very helpful in this situation.
Solar Software can string the lights for you.
Finally, cutting-edge technological innovations like Aurora’s autostringing feature can really string your beads for you! It will offer you with the best stringing setup while taking into account the factors stated above.
Key Learnings:
- Solar panels may be connected either in series or parallel; which is best depending on the circumstances. In general, parallel is preferable when there might be shading problems.
- Don’t forget the vital information you require:
- DC input voltage maximum
- Initial voltage
- Greatest input current
- Quantity of MPPTs
- Voltage on an open circuit
- Current in a short circuit
- To avoid underperforming systems, we don’t advise utilizing simple STCs to determine the optimal inverter range.
- Be careful to link strings with comparable circumstances to the same MPPT ports (or maintain similar conditions for all strings).
- As alternatives, think about microinverters and inverter clipping.