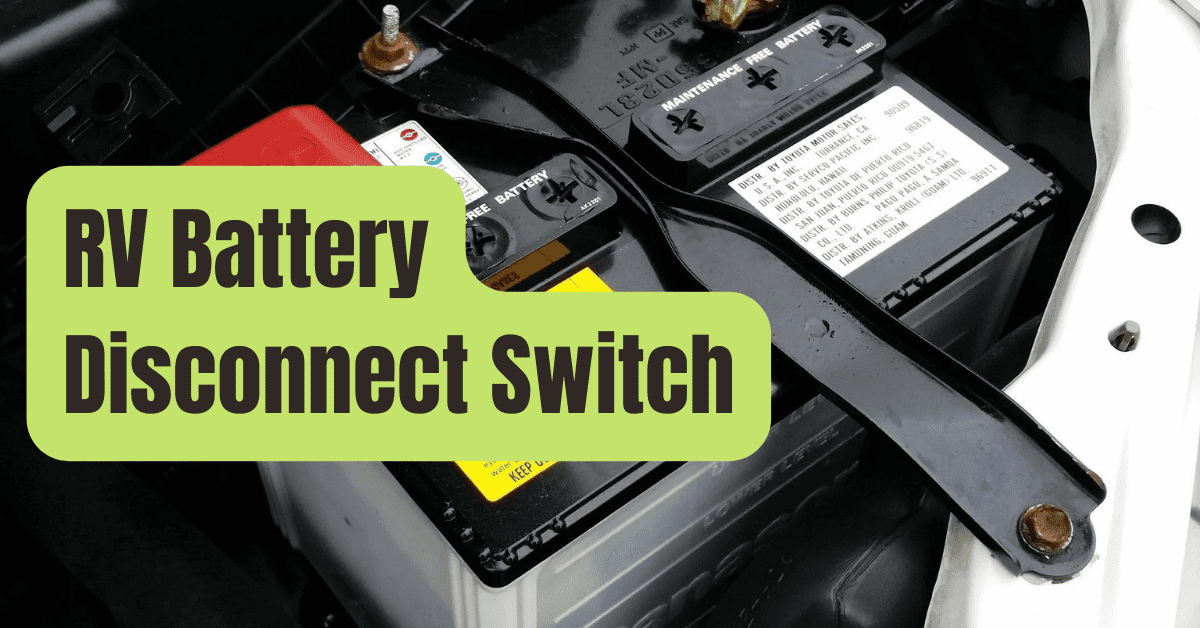
This is an excellent time to write a piece about the RV battery disconnect switch since it is a simple, affordable solution to prolong the life and good health of RV batteries as we approach the time of year when many (but not all!) RVers park their vehicles for the winter.
Before the snow starts to fly for you northerners, let’s get started!
How Does an RV Battery Disconnect Switch Work?
Using a battery disconnect switch saves you from having to physically disconnect your RV battery bank while providing a quick method to temporarily shut off electricity to a circuit.
An RV’s battery may be rapidly and easily disconnected from the RV’s main circuits using a battery disconnect switch.
We’ll cover these reasons and more in a minute.
There are a number of reasons why someone may wish to do this.
But first, let’s examine the precise operation of an RV battery disconnect switch.

What Functions a Battery Disconnect?
Strategically positioned between the cable and the negative battery terminal is a battery disconnect switch.
When applied to an RV battery, it interrupts the flow of electricity via the negative battery wire, cutting off the supply of power to the outlets, appliances, and amenities provided by the 12V fuses dispersed throughout the RV.
Therefore, an RV battery disconnect switch provides a simple means of cutting off electricity to all 12V circuits within the RV.
As a result, the battery doesn’t lose power.
When Should Your RV Battery Be Disconnected?
As we indicated at the start of this essay, storing the RV for a lengthy period of time is perhaps the most apparent moment when one may think about employing an RV battery disconnect switch.
Batteries will discharge and deteriorate over time if they are not utilized, which is the cause of this.
The parasitic drains in the RV cause this, and exposure to cold conditions may also cause it to happen.
All of this has an adverse effect on a battery’s general health and unquestionably reduces its lifetime.

Nevertheless, if your RV is plugged into shore power while being stored, you should be aware of the following:
You should keep the battery disconnect switch closed if your batteries are lead-acid, your RV has a multi-stage converter/charger with a storage mode, and you are using shore power during the storage time (meaning you do not want to use the switch to disconnect the battery bank).
Open the battery disconnect switch (disconnecting the system loads from the batteries) if you keep your RV without a shore power connection to stop parasitic drains on your batteries.
You would be better off unplugging from shore power, opening the battery disconnect switch (disconnecting the system from the batteries), and using a battery tender on your battery bank if your RV has an older, single-stage converter/charger.
Lithium-ion batteries don’t need a trickle charge while being stored, thus you may (and should) utilize your battery disconnect switch if you have them.

What other situations can call for the usage of an RV battery disconnect switch?
Anytime you operate on your RV’s electrical systems, a battery disconnect button comes in handy.
When working on the electrical system for maintenance, repair, or modification, or when attempting to diagnose a specific problem, the RV battery disconnect switch serves as a safety measure, guarding you against the potential of electrical shock.
In addition to preventing battery loss, a reliable RV battery disconnect switch will guarantee safety while doing maintenance and may even prevent electrical fires.
You may also put a battery disconnect switch on an engine battery to enable you to detach the engine battery for lengthy periods of storage.
This prevents parasitic loads from electrical circuit boards, computers, etc. from causing the engine battery to deplete.
Batteries do have a tendency to lose charge naturally over time, so if the storage duration is lengthy, you may also wish to use a battery tender in this case.

Do All RVs Have A Switch To Disconnect The Battery?
The manufacturer is more likely to have fitted battery disconnect switches in newer RVs.
Installing a battery disconnect switch is neither difficult nor costly for RVs that weren’t built with one.
However, it’s crucial to choose a battery disconnect switch that is rated for both the battery in your car and the highest possible DC loads your RV’s electrical system can encounter.
An Intellitec Battery Disconnect was installed in our equipment at the manufacturing.
The switch in our control panel activates or deactivates a master solenoid, turning most (but not all) of the 12V electricity in the RV on or off.
Because RV salesmen use it to turn the electricity on and off in the RVs while they are parked, it is sometimes referred to as “the salesman switch.” By doing this, the home batteries are protected from being discharged by visitors’ lights and other gadgets that are left on in the RV.

The disconnect doesn’t stop ALL power pulls on our RV (and probably most others that have this option).
When the switch is in the “Store” position, certain accessories (such as slide-outs, power stairs, awnings, etc.) still have power since they are not linked to the disconnect.
This is done in part for safety reasons; it’s crucial, for instance, that the stairs expand as the door opens! However, the owner of an RV using this sort of battery disconnect system must be aware that the button on the control panel does not entirely turn off all possible power pulls.
The kind of switches that mount inline with a battery’s (or battery bank’s) negative terminal guarantee that you have a way to turn off ANY possible loads.

Where Is The Battery Switch On My RV?
In most cases, the battery compartment is where you’ll find an RV battery disconnect switch.
The disconnect switch may be found directly off the wire, before anything else, including the ground, if you examine the wiring for your batteries.
This is necessary so that when the battery disconnect switch is activated, the whole system may be turned off.
Your battery disconnect switch can be positioned in the maintenance bay if it’s close to where your batteries are.

It could also be found on the battery itself, particularly if the previous owner placed one there.
Perhaps engine batteries experience this more often.
How Can a Battery Disconnect Be Installed on an RV?
It’s not difficult to install an RV battery disconnect switch, but you should take care to do it correctly and choose a switch that is suitable for your RV’s electrical system.
In essence, you will connect the negative cable to the disconnect switch and unplug it from the system’s RV side.
The switch will then be connected to the battery bank via a smaller negative connection.
The switch must be engaged to turn off the RV’s 12V power supply.
In order to avoid confusion caused by the language, allow us to be redundant for a moment:
No electricity will pass to the RV while the switch is open or off (disengaged).
The 12V systems in your RV may function while the switch is closed or on (engaged).
So that you know whether you’re opening or shutting the circuit, a good battery disconnect switch will be clearly marked.
Important Information:
Some recreational vehicles (RVs) come with battery disconnect switches that are attached to the positive battery line entering the RV.
Although there is nothing wrong with it and the switch’s outcome is the same, it is preferred to place your battery disconnect switch on the negative side.
This is why:
The negative side of the battery should be detached if you ever need to work on its wiring.
Otherwise, if the positive lead comes into contact with the RV’s frame, a short circuit might result.
However, if your battery disconnect switch is installed on the negative lead, you not only eliminate the risk of a short circuit but also eliminate the need to remove and isolate the negative cable.
Of course, you can completely avoid this situation by disconnecting the negative side before conducting any work.
By activating your battery disconnect switch, you may achieve that disconnect.
To install an RV battery disconnect switch, follow these three steps:
- Remove the negative cable from the system’s house (RV) side (coming from the RV to the battery).
- Connect that negative connection to the disconnect switch’s output side.
- A short piece of cable should have one end connected to the switch’s input side and the other to the battery bank’s negative terminal. NOTE: Your switch could come with this cord. If not, you must purchase wire of the same gauge as the one previously installed in your system. For convenience, you may choose to purchase wire with the lugs already connected to the ends.
The switch itself may need to be mounted within your electrical bay, on top of your battery case, or anywhere else is most appropriate for your specific scenario, depending on the sort of switch you bought.
What Kind Of Disconnect Switch For An RV Should I Purchase?
Switches to disconnect batteries are often affordable.
Even though they may seem different, they both function in the same way, cutting the battery bank’s supply of power to the RV.
The alternatives listed below have received several positive evaluations.
All are simple to install, but depending on how the switch mount is made, one kind may be more effective than another for your specific purpose.
#1. Blue Sea Systems 300 Amp m-Series Battery Switch
This is a single circuit ON-OFF switch, however after you go to the Amazon website, you may choose from several models.
One battery is switched by this device to one load group.
With a maximum voltage of 48V DC and a continuous rating of 300A, this switch complies with IP66 waterproof standards.
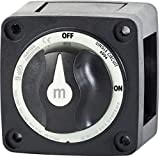
Blue Sea Systems Battery Switch m-Series ON/OFF with Knob, Black, 6006200
- Single Circuit ON-OFF switch, Black, m-Series Blue Sea Systems Battery Switch with Knob, 6006200. A single battery is switched to…
- IP66 waterproof, ISO 8846 compliant, and ABYC approved. Safe for installation on gasoline-powered boats; ignition protected
#2. Ampper Battery Switch, 12-48 V Battery Power Cut Master Switch Disconnect Isolator
This switch is a single circuit on-off switch, similar to the one that was previously mentioned, however other varieties may be selected at the time of purchase.
The housing of this heavy-duty switch is made of ABS plastic.
Unusual for this sort of switch, the sides and back may both be completely covered, or not, protecting the terminals from short circuits.
This switch has a simple rotary knob that is equally simple to read: red indicates “off” (electricity is turned off), and green indicates “on” (power is flowing).
This switch can handle 12V DC currents of 275A continuously, 455A intermittently, or 1250A momentarily.
It may be used with a second switch and for systems ranging from 12 to 48 volts.
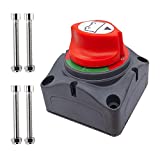
Ampper Battery Switch, 12-48 V Battery Power Cut Master Switch Disconnect Isolator for Car, Vehicle, RV and Boat (On/Off)
- Heavy Duty: ABS plastic housing, long-lasting and designed for safety usage; the back cover protects the terminals from any short circuits; it comes with four sets of…
- Operation: On/Off 2 positions, continuous current of 275 A at 12 V DC, intermittent current of 455 A at 12 V DC, and momentary current of 1250 A at 12 V DC.
#3. Top Post Knife Blade Master Switch, Ampper 12V / 24V Battery Disconnect Switch
This blade-style on/off switch, which just rests on top of the negative post, is suitable for use with a single battery.
This switch delivers 200A continuous and 600A momentary at 12V DC and is suitable for a 12V-24V DC system.
This blade switch, which is made of solid brass that resists rust and corrosion, requires space for the blade to be raised, as shown in the picture.
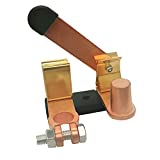
Ampper Top Post Knife Blade Master Switch, 12V / 24V Battery Disconnect Switch Isolator Power Cut Off for Marine Car Boat RV ATV (Negative)
- Compatible: utilized for top post terminal, 15–17 mm tapering/conical battery NEGATIVE post only, DC 12–24V system, 200A continuous, 600A momentary at…
- Convenience: vertical knife blade type, simple installation & operation. When you raise the knife, power will cut.
This information should help you understand the function of your RV’s battery disconnect switch as well as how to install one if your RV doesn’t currently have one.
These simple cut-off switches provide convenience and safety, making the minimum installation work well worth it.
An RV battery disconnect is an excellent DIY solution to improve convenience and safety for your RVing experience because of its cost.