Remove Your Old Stereo And Replace It With A New One.
The fundamentals of car radio installation — We’ll guide you through the process of installing a new vehicle radio in this post.
We’ll talk about:
- How to Dismantle a Factory Stereo
- What you’ll need to know to properly attach the new receiver is how to wire it.
- What is the best way to install a new vehicle stereo?
Please go through these instructions before starting the installation so you’ll be prepared.
Prepare your Toolkit.
You’ll need a few tools to complete the task, but nothing too complicated.
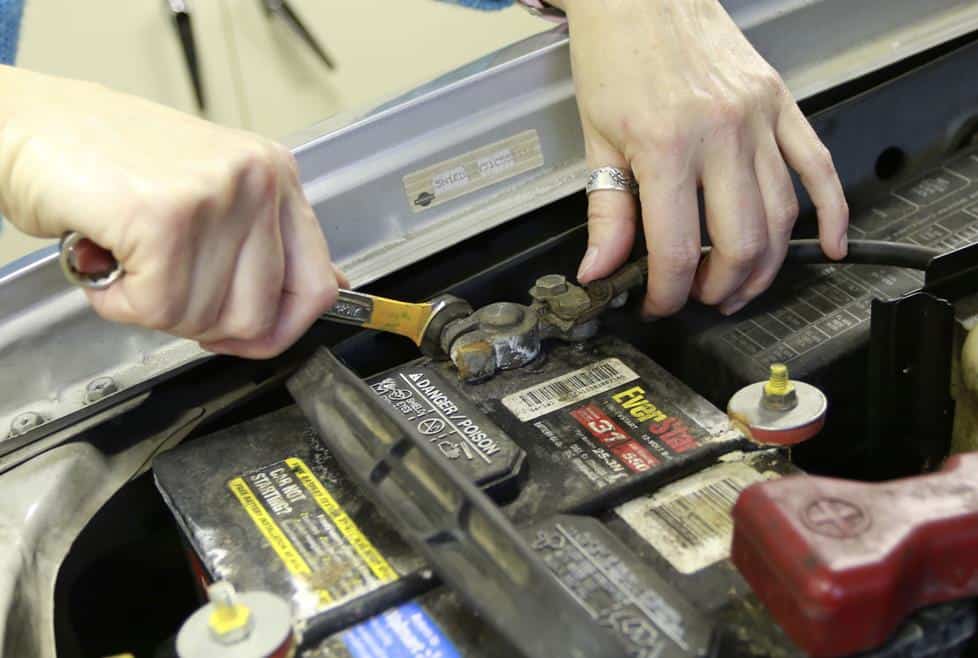
The most frequent tools are a pair of screwdrivers and a wrench or socket set for the battery wire.
You’ll also need wire strippers, electrical tape, and a technique to connect the wires, which we’ll discuss later.
A panel removal tool is one of the most crucial equipment you’ll need to carefully remove the dash panels without damaging the surfaces or destroying anything.
Related: 10 Best RV Stereos of 2026
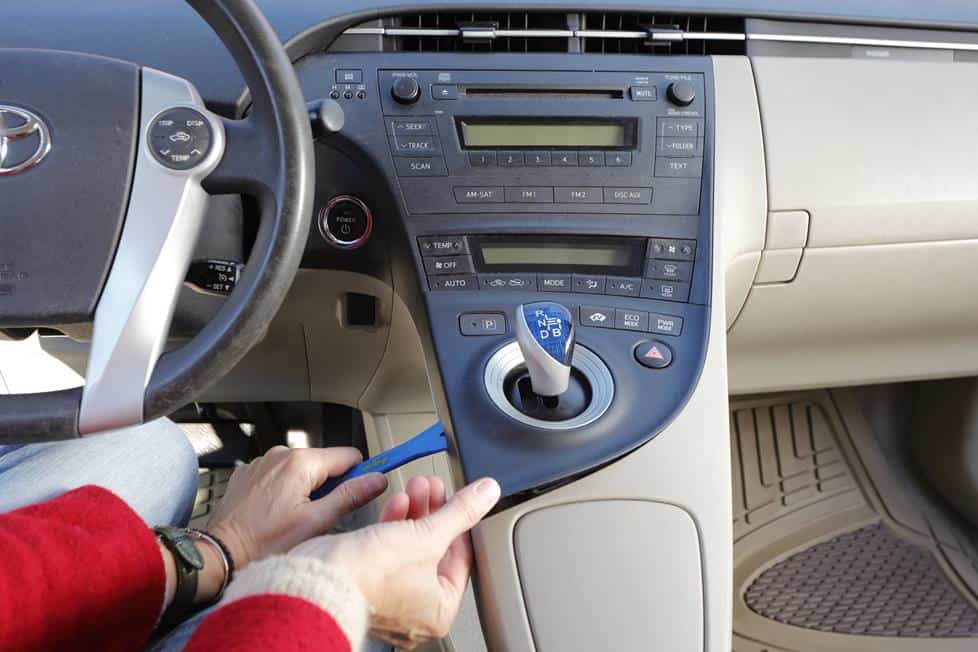
Use the correct tool for the task to protect your trim panels.
This Video Will Show You How To Install A Simple Vehicle Audio Step By Step.
Check out this video of one of our senior advisers installing a stereo if you want a more visual representation.
He takes you through the whole process from beginning to end, offering professional advice along the way.
Taking Off The Factory Stereo
The first step in installing a new audio in your automobile is to uninstall the old one.
It’s easy to get caught up in the removal process and forget about it.
But don’t be in a hurry! Because you’ll be reversing this method to install a new stereo, make sure you recall the order of these steps.
Refer to your Crutchfield MasterSheetTM instructions for full instructions on how to remove the factory stereo that’s particular to your car.
They’ll lead you through the procedure step-by-step.
Otherwise, follow the basic rules listed below.
Using MasterSheet instructions in conjunction with the basic recommendations listed below will be a winning combination.
To avoid accidently short-circuiting anything, set the parking brake and disconnect the negative connection from the vehicle battery before you begin.
The majority of the time, your factory stereo will be installed in one of the following ways:
- Spring clips hold it in place in a metal mounting sleeve.
- Brackets fastened to the dashboard
- Inside the dash, installed on a rail system
Related: How to Wire Car Speakers to the Radio Without the Harness?
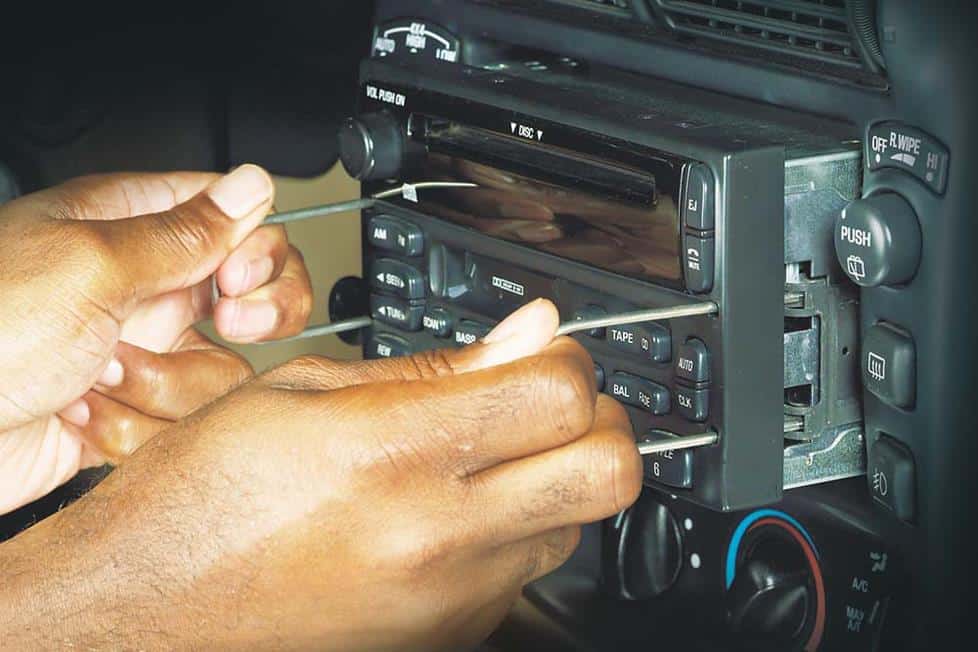
Taking Out A Radio That Is Held In Place By A Spring Clip
A pair of DIN tools will be required if the stereo is held in place by spring clips.
Place the DIN tools in the holes on each side of the unit until a click is heard.
The tools are used to loosen the spring clips as well as hook onto the sides of the stereo to make it easier to remove.
Pull the stereo out of the dash after spreading the tools apart slightly.
Taking Out A Stereo That Is Affixed To The Wall
Accessing the audio may need the removal of one or more dash trim panels.
To dismantle other components of the panel, you may need to (carefully) peel the plastic trim away from the dash (which is typically attached by concealed pressure clips), or find and remove bolts.
You should be able to see screws that attach the stock stereo to the dash after you’ve obtained access to it.

Pull The Stereo Out Of The Dash By Removing The Screws.
Taking out a stereo from a train system
The factory radio is mounted on a guide rail within the dash in certain vehicles.
After removing the spring clips or nuts, you may slide the radio off the rail.
This rail may have to be removed as well since it might occasionally interfere with the chassis of a new radio.
Keep in mind that after you’ve done this, you may not be able to restore the factory radio.
Stereos For Older Automobiles
Before the early 1980s, many American automobiles used “shaft-style” stereos, which were attached to the dash by nuts and washers on the right and left knobs.
From beneath the dash, a shaft-style stereo must be mounted.
The tough part is getting it into place, since your vehicle’s wiring, heating controls, and ductwork may be in the way.
RetroSound, one of our sellers, has a number of classic shaft-style radios with contemporary capabilities and a flexible mounting mechanism.
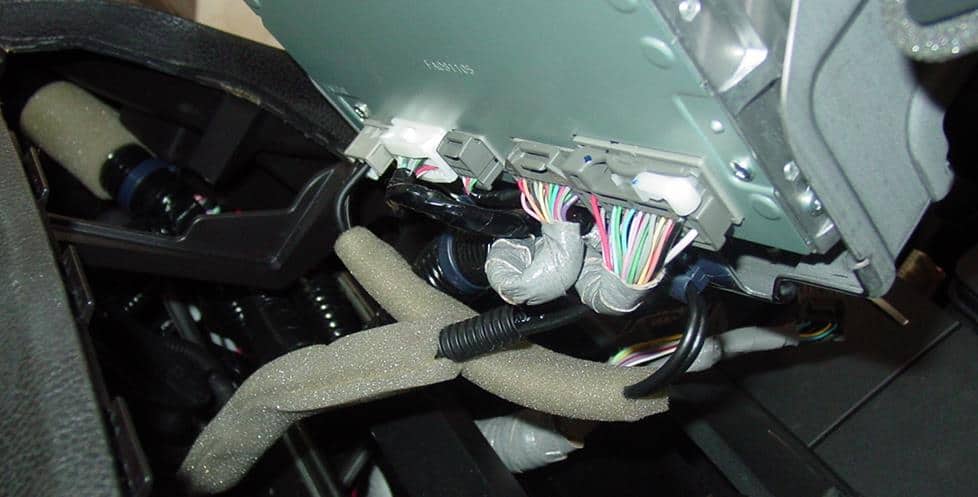
Disconnecting The Factory Stereo
There should be at least one plastic wiring harness beneath the stereo aperture if your car has (or ever had) a factory stereo, or if it was pre-wired with a “stereo prep” kit.
This connection links the stereo to the electrical system and speakers in your car.
To finish the removal procedure, unhook the OEM stereo from the wire harnesses and unplug the antenna.
It’s time to concentrate on the new radio now that the old one is out of the way.
All of the cables must be connected before the stereo can be installed in the dash.
What Is The Best Way To Wire A Vehicle Stereo?
You may utilize a vehicle-specific wire harness from Crutchfield to connect your new radio to your vehicle’s factory wiring harnesses if Crutchfield sells one for your vehicle.
This will verify that everything functions as it did with the OEM stereo.

A color-coded wiring schematic for connecting the harness to your new stereo is normally included with these harnesses.
The owner’s handbook for your new stereo will also contain a radio wiring schematic.
Confirm the vehicle stereo wire colors that must be attached to the adaptor harness using the two diagrams.
The good news is that these connections may be made on a workshop, desk, or kitchen table without having to leave the car.
If you don’t have a harness for your vehicle or the original stereo plug has been broken out, you’ll need to identify each of the car’s stereo wires and connect them to the matching wires on your new system.
Our Tech Support staff may be able to tell you the colors and functions of your car’s wiring if you got your new audio from Crutchfield.
Related: How To Wire a Car Stereo From Scratch?

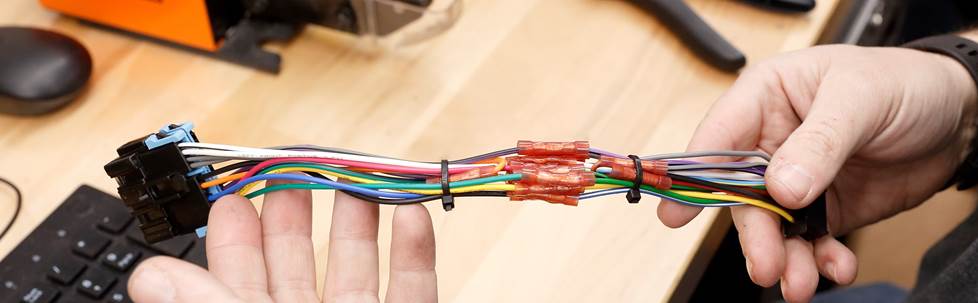
Connecting The Wiring Options
You’ll need to connect bare wires, and there are a few options for doing so.
Please don’t just tape the wires together; the tape will eventually dry up and break off, exposing the wires and making it all too easy for anything to short out.
Here are several alternatives for establishing secure, long-lasting connections:
- Soldering enables optimal current transmission by forming a lasting, professional connection. To insulate the soldered connection, we highly advise you to use heat-shrink tubing and a heat gun. This approach is preferred by most purists because it provides the most secure and conductive wire connection.
- Posi-ProductTM connectors are re-usable and provide a rapid and secure twist-on connection for wires. It’s also a good idea to keep a few Posi-Tap connections on hand for varied tasks. This is our preferred method for quickly establishing strong bonds.
- Crimping is a quick and easy process. If you’re going to crimp the wires together, make sure you’re using the right size crimp connection – most in-dash audio lines are 18 gauge, but some include thicker gauge power and ground wires. Crimp connections come in a variety of shapes and sizes, including bullet connectors, butt connectors, and crimp caps.
- The Crutchfield ReadyHarnessTM service streamlines your installation by allowing us to handle the majority of the labor. Before we dispatch your new stereo, we’ll take the harness from your new stereo and the vehicle-specific adaptor harness and properly connect the two. When you tell us what vehicle you drive and choose a new radio, we’ll let you know whether this service is available for it.
Allow Crutchfield ReadyHarness to do the work for you.
Wires For Power
Normally, all of the new stereo’s wiring connections should be made via the wire harness, but if you must make a direct power connection, you’ll need to understand the difference between “switched” and “continuous” power:
- When the ignition is turned on, a switching power source is activated. Connect the primary (switched) power connection on your new stereo – commonly a red wire – to a switched power source so that the stereo turns off when you turn off the car and does not deplete the battery.
- When a continuous power source is used, it is constantly on. Connect the memory connection on your new stereo – generally a yellow wire – to a consistent power source so you don’t lose your radio station presets, tone control presets, or clock settings when you switch off the car.
A few high-powered stereos demand a direct continuous power connection at the positive terminal of your vehicle’s battery, which is uncommon.
A thicker power cable, an in-line fuse (which is normally supplied), and a ring terminal to connect the power wire to the battery clamp are all required.
To make the connection at the battery, you’ll need to route the power cable through the car firewall and into the engine compartment.
Wiring For Speakers
For the standard 4-speaker system, car stereos include eight wires: a positive and a negative wire for the front left, front right, rear left, and rear right speakers.
Some of them may or may not be utilized depending on your vehicle’s wiring setup and the wire harness adapter we sell.
A Grounding Wire
For appropriate stereo performance and to prevent unwanted noise, a robust ground connection is essential.
Look for a raw, unpainted bolt or screw that touches the bare metal of your vehicle’s chassis if you aren’t utilizing a bespoke wiring harness.
Tighten the bolt after loosening it and slipping the ground wire below (it’s nearly usually a black wire).
Your stereo will not work if the ground wire does not make touch with bare metal.
Signal noise may be caused by a loose or weak ground connection, interfering with your music.
Taping Into The Parking Brake Wire Via In-Dash Video
You’ll also need to connect a wire to your emergency/parking brake wire if your new audio includes a touchscreen or video display.
When the parking brake is applied, this wire works as a switch to turn on the video monitor.
Depending on the braking design, this wire may be located at several places in different automobiles.
Usually, the wire may be discovered near your parking brake.
To access the hand brake on automobiles with a hand brake between the front seats, you’ll need to remove the center console.
The stereo’s cable will need to be routed beneath the dash in cars with a foot-pedal parking brake.
It isn’t difficult in any case; just take your time.
Crutchfield’s award-winning tech support staff can once again assist you in identifying it and getting to it.
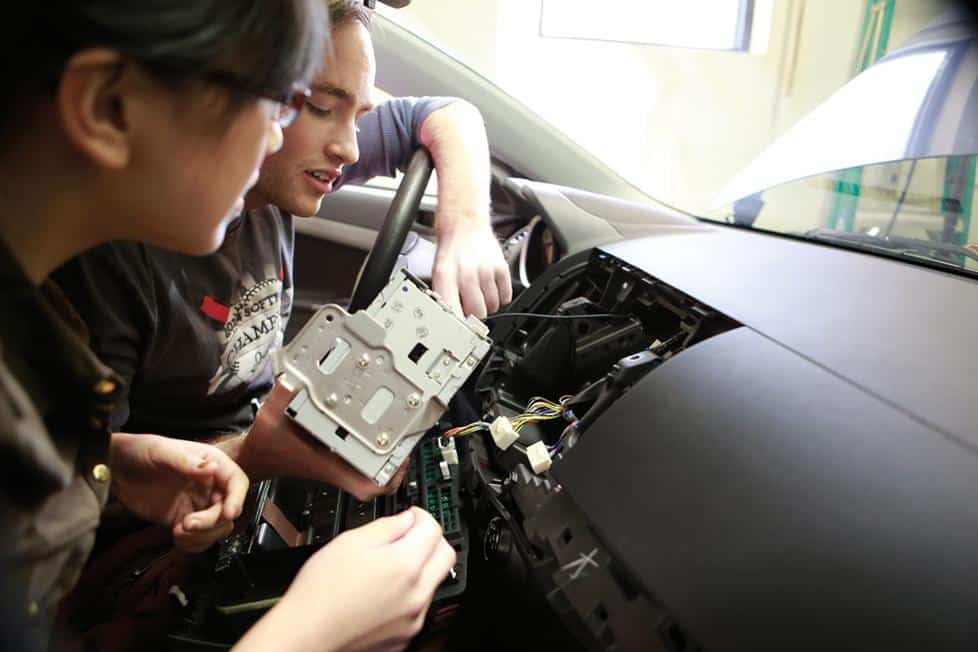
Installing The Radio In The Dashboard
If your old stereo was bolted into the dash, you may need to remove the mounting brackets from the sides and replace them with the mounting brackets from your new stereo.
Installing the stereo will most likely need the use of a mounting kit.
If you need to use a mounting kit, follow the directions that came with it.
The kit is often installed in the dash first, then the new stereo’s metal mounting sleeve (if provided) is slotted into the kit.
Bend the metal sleeve’s metal tabs into position with a screwdriver to secure it.
In other circumstances, the mounting kit is attached to the new stereo first, then both are secured in the dash with screws.
If your car has an enhanced factory sound system (such as a Bose or Harman Kardon update) or an integrated stereo/climate control panel, installing a new stereo will almost certainly need a specific factory system wiring adaptor.
You may use an adapter to connect a new stereo to your old speaker system.
And when you get your new radio from us, you’ll receive it at a great price.
In certain 2010 and later Ford Mustangs, this integration kit allows you to preserve the factory LCD panel and touchscreen temperature controls.
Hold the stereo near the opening after the dash opening is ready for the new stereo.
Connect the antenna cable and the stereo wire adapter to the vehicle’s electrical harness.
Depending on the stereo you pick, you’ll also need to connect the Bluetooth® microphone wire, a USB cable, a steering wheel control interface, or an auxiliary input cable to the back of the radio.

Please Double-Check Your Work.
Place the stereo in the dash aperture but don’t secure it just yet.
To begin, test the stereo to ensure that everything is in working order.
While everything is still visible, it is simpler to repair an issue.
Note: In order to test the stereo, you’ll need to reconnect the battery wire, therefore if you unplugged any airbag warning plugs, be sure to reconnect them before reconnecting the battery.
Turn on the electricity and test each source (AM, FM, CD, USB, etc.).
Then ensure that each speaker is operating by adjusting the balance and fader settings.
Finish fastening the stereo in the dash and restore any sections of dash trim panel you removed after you’re confident it’s connected and operating correctly.
What About Some Alterations?
To install a new audio in certain automobiles, you may need to make changes to the dash aperture or the inside region (referred to as the “dash substructure”).
If this is the case with your car, we’ll notify you when shopping on our site and in your Crutchfield MasterSheet.
Again, if you need assistance, don’t hesitate to contact our tech support team.
Related: How Much Does It Cost To Install A Car Stereo?
Are You Ready To Give It A Shot?
You should have a good notion of what it takes to replace your factory radio with a new, better aftermarket stereo by now.
Now is the time to visit our Crutchfield Outfit My Car tool, where you may tell us about your car.
You’ll be able to check which stereos, speakers, and other gear will work with your car, as well as the installation equipment you’ll need to accomplish the job correctly, from there.