Reversing a big vehicle such as an SUV, sedan, bus, RV, or truck is one of the most difficult things to perform since you don’t have a great perspective of what’s immediately behind you.
You may believe that merely rotating your head around would keep you safe while backing up, but this is not the case.
A simple answer is to get a reversing backup camera, which will allow you to back up securely without striking anything.
“How do I install a backup camera?” and a basic guideline is provided here to assist you in making the best effort to install a backup camera in your car.
You must connect a camera and a monitor to your car in order for these systems to operate.
You may discover camera systems that can be utilized globally as well as ones intended for certain makes and models if you search online.
There will also be a distinction depending on the sort of vehicle you possess.
Back up cameras come in a variety of kinds and styles, including flush mount cameras, surface mount cameras, and license plate cameras.
To choose the best backup camera for your car’s rear, you must first determine your needs and preferences.
For non-cars, such as trucks and vans, a truck or rear view cameras are required.
Many individuals will choose to mount the vehicle’s lens on, around, or on top of the rear bumper.
Most backup cameras are intended to work with the car’s rear lighting system, which is helpful since the camera turns on when you shift into reverse and sends a signal to the front-seat display.
When you reverse your car, the camera activates and sends a feed to the display, allowing you to backup securely without danger of colliding with anything.
These solutions will be incredibly handy if you are prone to striking things while backing up.
Why Do You Need To Install A Backup Camera In Your Car?
1. Accident Prevention: The primary rationale for having backup cameras in automobiles is to avoid accidents. If you can see precisely what is behind your car when backing up, you can reduce your risks of striking someone or anything, which is only achievable with a visual assistance like a backup camera.
2. Person: Installing a car backup camera is a question of safety and a necessary for individuals who have young children. It may assist those who have poor sight concerns in avoiding potentially striking their children.
3. Reduce financial Loss: The problem of financial damage that may develop if you bump on things is another reason why you should install backup cameras in the back of your automobile. Despite the lack of statistics, the cost of all these back over accidents must be enormous. Aside from the expense of injuries, there’s also the cost of repairing property, automobiles, and the time spent resolving these collisions.
4. Required Accessories for Cars: Backup camera systems are the most recent advancement in vehicle safety. This is a modern safety installation that cannot be avoided, much like the shuttering glass and seat belts that came before it.
What’s Better to Install: Wired or Wireless?
Wireless Backup Camera: To communicate pictures from the RV backup camera to the display, digital wireless backup cameras employ a wireless transmitter and receiver. Wireless RV backup cameras are the simplest to set up, and they need two power sources. Longer vehicles, such as RVs, should choose for the wireless version, since the cable version is difficult to install.
Wired Backup Camera: The camera/monitor in a wired backup camera system is linked to a power harness. Only one power source is required since the components are connected by a cable that runs the length of the vehicle. Although wired backup cameras have better visual quality than wireless backup cameras, they are more difficult to install since cables must be routed from the rear to the cab.
What Are the Requirements for Installing a Rear Backup Camera?
To install it, you’ll only need a few basic tools or accessories:
1. Furrion camera adapter: To prevent drilling holes and cutting cables on your RV, you must use our bracket adapter to place the camera on the Furrion ready RV. If your RV doesn’t have a Furrion mount and you don’t want to drill holes, follow the instructions on this blog to install the backup camera.
2. Screwdriver
3. Pliers
4. Sealant made of silicone
Installation Instructions for Backup Cameras:
We’ll teach you how to install the Haloview backup camera MC7108 on a Furrion pre-wired RV in this installation guide.
Step 1: Purchase A Camera That Is Appropriate For Your Car.
Obviously, the first step is to choose a camera that is suitable for your vehicle.
Choose the finest backup camera for your car based on the distance between the display and the camera.
When the distance is more than 33 feet, we suggest utilizing our Range Dominator series camera system.
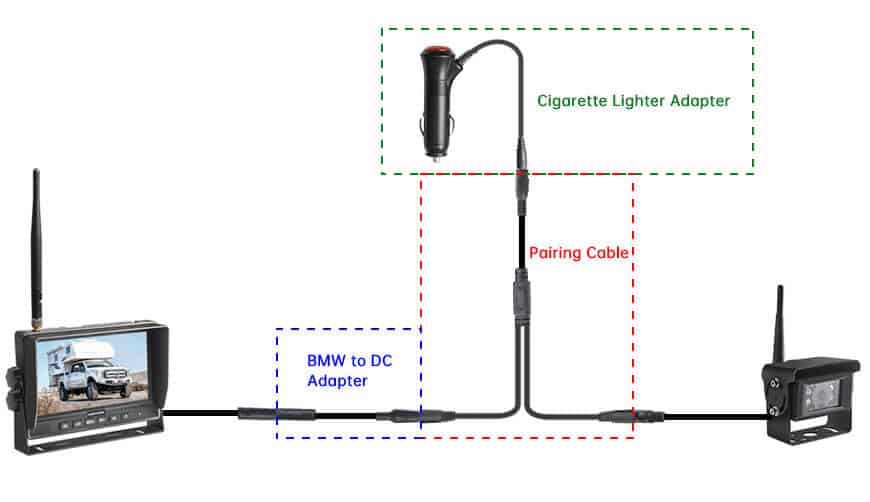
Step 2: Verify That The Monitor And Camera Are Connected.
Plug the cigarette lighter power cable adapter into your cab’s cigarette lighter, then attach it to the Paring Cable.
At the end of the Paring Cable are two DC male connectors, which you may connect to the camera and monitor’s power cables.
Please see the graphic below for further information.
To power them up, press the push on button on the cigarette lighter power cord adaptor.
If the camera isn’t already connected to the display, follow the procedures below to connect it:
- To enter PAIRING state, press the OK button for 3 seconds; you will have 20 seconds to pair.
- If you disconnect the camera from the Pairing Cable and reconnect it, the camera will automatically pair with the display.
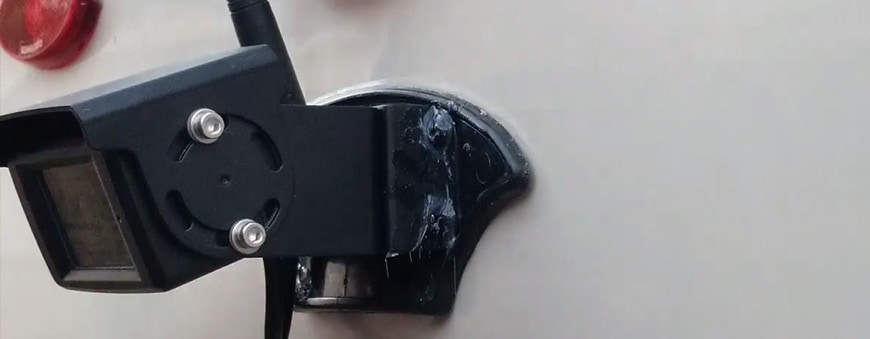
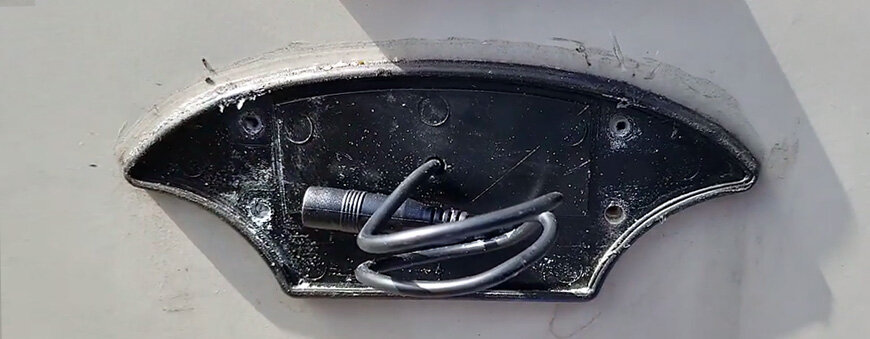
Step 3: Take Your RV’s Furrion Mount Off.
To reach the screws with a blade or screwdriver, you’ll need to remove part of the sealant, as seen on the left.
After removing the sealant and screws, you can simply pull the shark-fin bracket off, revealing the wire.
We’ll maintain the rubber gasket since it performs a fantastic job of keeping the water out.
Step 4: Examine The Trailer Wiring.
After removing the rubber, you can see where this wire is changed to 12-volt and goes into the clearance lights.
The backup camera will also get electricity from this location.
You won’t have to cut any cables with the Furrion wiring adaptor, which comes with the Furrion camera adapter.
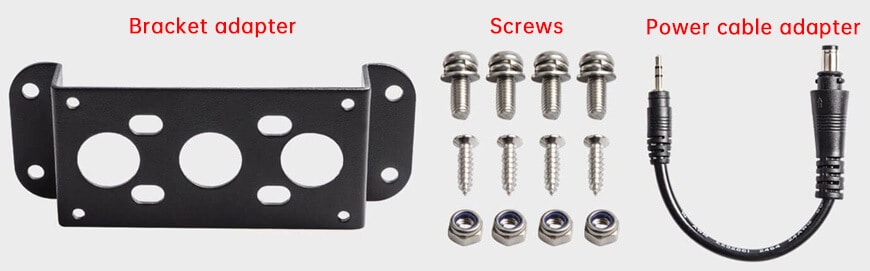
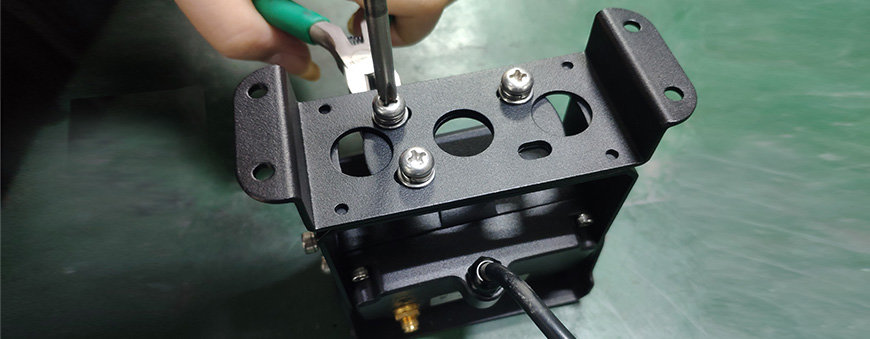
Step 5: Put The Haloview Mounting Bracket Together.
One thing to keep in mind is that our bracket adapter will match up with the factory hole on the Furrion rubber, eliminating the need to drill new holes.
To connect the brackets, position the screws as shown below, grip the nut with pliers, and tighten with the screwdriver.
Step 6: Connecting The Camera To The Trailer Wiring
Return to the ladder and connect the camera to the trailer cables using the Furrion wiring adapter after the camera is installed.
Before you attach it and finish everything, you should test the camera and monitor to ensure that the voltage is sufficient to power the camera.
Because the power supply voltage on certain Chevy or GMC trucks is insufficient to provide 12V for the trailer, you’ll need to install this booster module to fix the problem.
Step 7: Put The Camera And Monitor To The Test.
To activate the camera wire, switch on the monitor and the clearance lights.
Next, check to see whether your monitor shows a picture; if it doesn’t, see your installation instructions for troubleshooting advice.
After that, you may finish installing the backup camera.
IMPORTANT TIP FOR THOSE INSTALLING WITH A FURRION BRACKET ON THE BACK OF THEIR VEHICLE:
The RV’s rear red marker lights are wired with Furrion.
After you’ve mounted the camera on the RV, connect your car to the camper with your 7-pin connection, and then turn on your vehicle’s real headlights (not daytime running lights, which won’t turn on your RV marker lights).
The red marker lights are how the Furrion pre-installed plug obtains its electricity.
Step 8: Installing The Trailer’s Backup Camera.
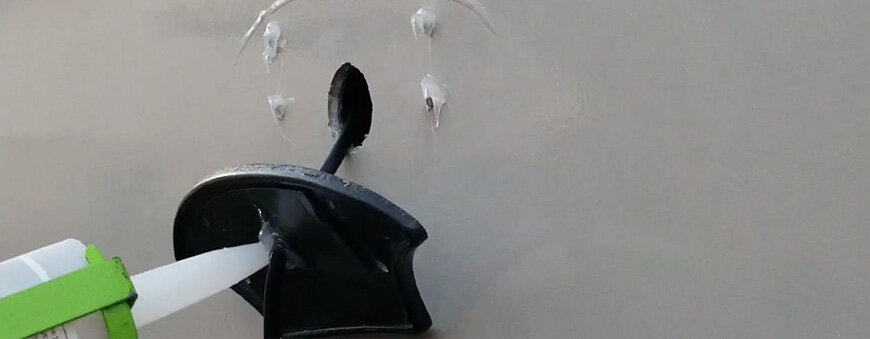
Now you must apply silicone sealant to prevent water from entering the wall.
Put some silicone in the four mounting holes, then seal them once the screw is installed.
Also, add some silicone where the wire is installed.
Running the cable through the rubber’s central hole and tucking the wires inside the wall will keep it from dangling outside.
White foam fills the walls of fiberglass RVs, and you may hollow out a tiny portion with your hands.
A crucial tip: don’t put all of the wire back inside the wall; otherwise, you’ll end up with a drip loop.
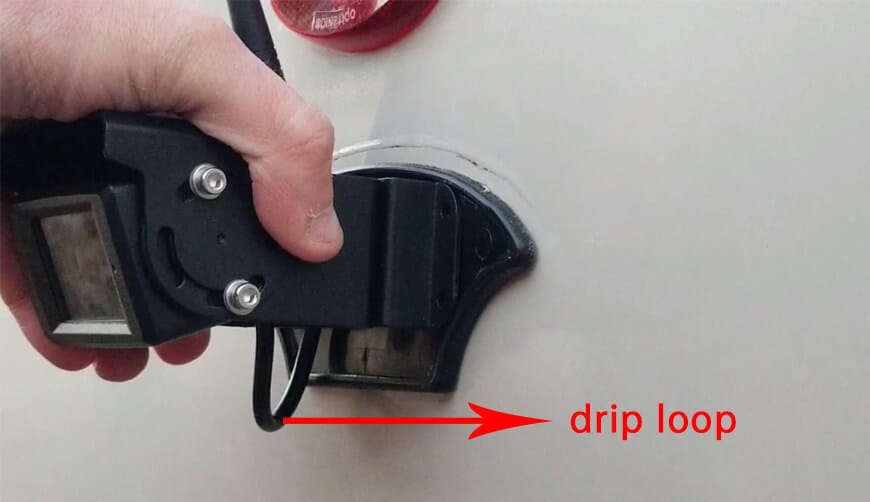
A drip loop is similar to a subpar line outside your house, or if you look at the internet cable or telephone lines coming into your house, you’ll see this little loop of wire cable hanging down and so that if any water gets on it, the water will go down and then drop off, otherwise, the water will follow and go right inside the hole, so with a drip loop, it will go down and just drop off the bottom.
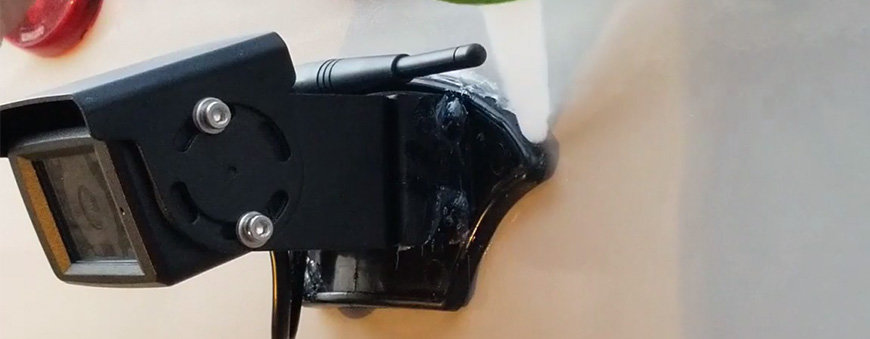
Put the four screws in and get it installed, then apply a little silicone to the screws to form a good watertight barrier when you tighten them down.
Next, screw them down and apply silicone over the top of the rubber.
It’s critical not to silicone the bottom because if any water gets in, you’ll want it to flow out the bottom; if you seal it and it gets in the top, it will pool within, leaving them with nowhere to go except inside the trailer.
Step 9: Take The Final Exam.
Now that you’ve installed the camera and connected everything, hop inside the cab and test the display to ensure it’s operating correctly.
Adjust your camera’s angle view to make sure it adequately covers the region you wish to observe.
The monitor must then be installed.
The dashboard, windshield, and rearview mirror are the most typical locations for the monitor.
Finally.
A backup camera car system will be an excellent tool for improving the safety and efficiency of your valued vehicle.
However, understanding how to operate your car as it was designed does not substitute the ability and experience gained by practicing with your backup camera system in a local parking lot, backing up into a spot marked with cones or tape.
With a little work and practice, you may avoid an accident and get more familiar with its functioning and capabilities.