It began while we were out west in the scorching heat of the desert.
When I’m driving, I prefer to have my backup camera monitor on so that I can keep an eye on my Honda CR-V that’s being towed back there.
I can’t tell whether I have a car back there without the monitor.
Is it still there or has it fallen off?
Anyway, I simply want to know what’s going on around my rig, which includes seeing out the rear.
This time, though, I was traveling and my screen began to flicker.
Really, really terrible.
It’d start off bright, but with time it’d deteriorate to the point where I couldn’t see anything.
Turning it off and letting it rest for a bit would be the only option.
Then switch it back on, and it should be OK for a time.
However, it would eventually repeat the whole process.
In the end, all I did was adapt.
I’d leave it off most of the time and just turn it on to check on the vehicle back there.
And, of course, the monitor comes on automatically while I’m pulling into a campground in reverse gear.
However, the monitor deteriorated.
Even when the screen is turned on, it seems to be bleached.
The picture has fading, and there is a white haze over it.
Clearly, my motorhome’s original backup monitor is deteriorating and has to be replaced.
Voyager created the earliest backup monitor.
It’s a VOM-78 Voyager.
It’s a 7-year-old monochrome camera “CRT (cathode ray tube) monitor (like an old-school computer monitor or TV).
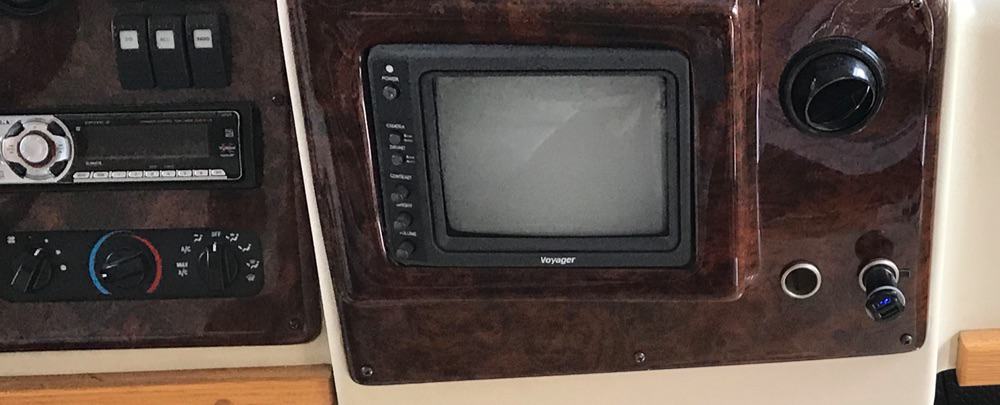
The VOM-78 is no longer manufactured.
LCD technology is currently used in all new displays.
So, here are the questions:
- What monitor can I put in my RV’s dashboard that will fit in nearly the same area as the original VOM-78 and look good?
- Will my old equipment’s wires work with my new equipment?
There are a variety of wireless and portable systems available, but I needed something that could be installed directly into the dashboard.
Plus, I feel that sticking with Voyager will make compatibility with wires and the back camera simpler.
These kinds of things are usually kept under wraps.
RVCams.com was the first site that came up in my search.
RVCams provides an excellent assortment of backup camera systems, according to Tim.
Furthermore, he has completed the majority of the work necessary to assure compatibility with earlier systems.
On older RVs like mine, he makes it quite simple to discover appropriate, straight replacements for the rear backup monitors.
He also provides cables and adapters to make almost any system work, in addition to cameras and monitors.
I contemplated an off-brand monitor I saw on ETrailer at one point.
I didn’t go through with it, and it was finally taken off from their site.
Plus, I’m sure I’d have had to deal with RVCams to get the correct adaptor to make the off-brand display work with my Voyager camera anyhow.
As a result, I opted to get the whole package from RVCams.
Kit to Install 7 is a plug-and-play replacement that Tim offers “VOM78, VOM7SN, AOM70, and AOM78 are replaced with a Voyager LCD.
I placed my purchase on Sunday and received the package on Wednesday morning.
Replacement of the Voyager Monitor Installation
The fact that it is a straight replacement is one of the many advantages of purchasing from RVCams.
He even supplies the necessary adapters.
As a result, the actual installation (as seen in the movie) was quite straightforward.
- Remove the screws that keep the monitor in place in your dash panel.
- Unscrew the monitor from the bracket mount after the panel has been removed. Remove the old monitor’s camera input(s) and power, then completely remove the display.
- Connect the power and camera inputs to one end of the wire harness that comes with it. It’s a plug-and-play system.
- Then connect the other end of the wire to the new LED backup monitor directly.
- Optionally, test the new display to ensure everything is in working order. That’s exactly what I did.
- Install the new mounting bracket on the LED monitor’s back.
- Install the sunshade on the new backup monitor if desired.
- Install the new bracket (with monitor) on the dash panel such that the new monitor is visible through the hole.
- Re-mount the dash panel after stuffing the electrical harness into the dashboard.
It’s that simple.
One thing to keep in mind is that my previous system was completely monochromatic.
This new LED is color, yet it still displays monochrome due to the monochrome camera on the rear of my equipment.
I’d have to replace the camera if I ever decided to go full-color.
The harness on this display also contains cords to accommodate two extra cameras.
Because my equipment just has one camera, I don’t utilize them.
However, I suppose I have space for expansion if I ever chose to do so.
Overall, it was a simple update.
My old VOM78 was certainly on its final legs, so this was more of a repair.