Not everything will function properly.
That is the way things are, and in order to repair those RV components correctly, you need start by looking at the straightforward fixes.
then move on to the costlier and more challenging sources.
It will take some time to locate the issue, and it may be in the most unlikely of locations.
Although a system reset option exists, sometimes the simplest things are the root of the issue.
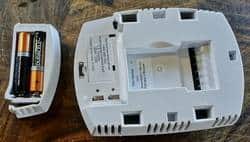
Look at your fuses, particularly the ones beneath your RV’s roof, to help you fix this problem.
Replace the fuse if it has blown, and you should be good to go.
Continue reading our post to find out how to repair a malfunctioning Dometic Duo Therm Thermostat.
It examines the matter in detail so that you have the knowledge necessary to do your own troubleshooting and, in turn, save some money.
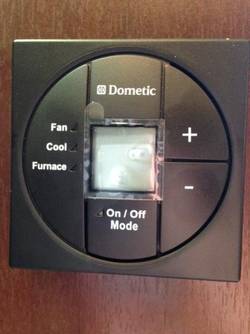
How Can I Reset My 5 Button Dometic Thermostat?
There is a system reset process to adhere to, which is as follows:
- Disconnect the plug.
- Next, flip the switch back to the On position while simultaneously pressing the mode and zone buttons.
- As you go, the digital display should show the letters FF, and they should stay there until you let go of the zone and mode keys. These letters could display instantly or, depending on your model, in 15 seconds, give or take a few seconds.
- When these letters do show, hold down the zone and mode buttons until they do, and then release them. Your computer should have been reset and be ready to use.
If the issue persists, you may also get in touch with the Dometic firm using this link.
By clicking on that link, you will be sent to their support website, which also has connections to additional necessary forms, their FAQ section, and other resources.
If you have blown fuses, burnt wire, loose wiring, or other mechanical issues that prevent the thermostat from operating, the reset mechanism won’t function.
Reset the Duo-Therm Comfort Control
The control will reset to its factory settings of 72 degrees Fahrenheit for cold and 68 degrees Fahrenheit for hot when you do this step, therefore keep in mind that all previous program memory will be wiped.
In comparison to the preceding part, the steps are a bit more complex.
- When you turn on the device, a light and data are shown on the annunciator. If they are, go to step 2, and if not, refer to section 5.1 of your handbook.
- To turn on the annunciator light, press the mode button.
- Next, hold down the up and down keys while pressing them simultaneously.
- Press the mode button with another finger while keeping the up and down keys held, then immediately release it. At this point, you simply need to push that button once.
- The up and down buttons may be released together with the mode button.
- Once again press the mode button. Both the light and the mode should go to “off.” Repeat the same actions if it doesn’t.
- Test the system to ensure that it has been reset and is operating properly.
- Once you see that it is operating properly, configure your settings to the desired levels.
Simply click here to get a handbook for this comfort control system if you don’t already have one. or find out where you may purchase a physical copy by going to the closest Dometic dealer.
How Can You Tell If the Thermostat in Your RV Is Bad?
A thermostat for an RV typically lasts 10 to 15 years.
That indicates that if you bought a secondhand RV, you could run into some issues with this gadget rather quickly.
Numerous factors, such as poor wiring, sand, filth, outdated wiring, and simple wear and tear, may cause thermostats to malfunction.
Here are several indicators that your thermostat isn’t functioning properly:
- The thermostat does not react to your orders – pressing the buttons has no effect.
- It has no power – wires may have fallen loose, a fuse may have blown, or it may have been unplugged. The display screen doesn’t turn on or does so dimly, the battery is dead, etc.
- The air conditioner or heater does not turn on – you have set the settings for both, but when such temperatures are reached, the appliances do not switch on.
- The air conditioner or heater will not switch off – once the temperature is set, the equipment will continue to operate.
- The temperature in the room differs from the setting on the thermostat.
After purchasing a remanufactured thermostat, you can discover that these problems have started.
Even though you may have believed you were saving money, a reconditioned equipment sometimes lacks warranties or guarantees, is improperly wired or repaired with subpar materials, etc.
Always purchase new, and although a DIY project is the cheapest choice, having a professional handle the installation is ideal.
Even if this choice may cost more, you at least have warranties and guarantees.
Test Duo-Therm Thermostat Procedure
Make sure the switch is switched to the on position before testing the thermostat.
Next, make sure the DC voltage is proper; it should be between 10 and 30 volts, and you should also verify the polarity.
Perform a system reset, and if nothing happens or there is a problem with the display screen, you will know that the wiring or the thermostat itself is the issue.
After that, double-check your settings to make sure it is set correctly if the proper setting doesn’t show up on the screen.
In either situation, replacing the gadget could be necessary.
Here is a link to the handbook if you need extremely specific instructions to help you with your installation.
You can find all the directions and illustrations you need in the handbook to determine if an installation mistake was performed.
You won’t have to waste time and effort looking for a replacement if there is a mistake.
Issues with the Duo-Therm thermostat
It would be lovely if everything in the world worked as it should to keep your RV running smoothly no matter how old it was.
However, this is not the case, and the following are some typical Duo-Therm thermostat issues and their fixes:
- The thermostat won’t turn on or remain on – Start by checking your on/off switch. No electricity will be sent to the switch if there is a break in the solder used to make the connection.
While you’re about it, be sure to go over every solder junction to make sure nothing is damaged or cracked. Simply replace the outdated solder with new solder and your soldering iron to resolve this problem.
- Cracked trace – To locate this issue, rub your finger down the circuit board. Once you’ve located the board cracks, all you have to do to patch them is solder a little piece of wire over the gap.
- Sometimes buttons won’t operate – The major cause of this problem is because too much dust has gathered on the buttons or within the thermostat.
Remove the cover and begin cleaning the switches to address this issue. The buttons may then be removed with a little screwdriver so you can inspect the contact points. Use some Q tips and contact cleaner to clean them.
Just reassemble everything when you’re through.
- The air conditioner is not cooling the area to the appropriate temperature – To identify this issue, use a portable thermometer to collect readings across the room before the air conditioner turns on. When the gadget goes off, take another reading at the same spots. There should only be a 3 degree +/- reading.
If the gap is bigger, use the reset system option to try to get the thermostat to function correctly.
Call a repairman in your region if the problem isn’t fixed.
As an alternative, you may examine whether the problem is covered in the owner’s manual.
Most modifications should be simple, and if they are more involved than that, it is best to leave them to professionals who have the right equipment and skills.
The E1 Error Code On My Dometic Thermostat Has To Be Fixed.
You are informed by this code that the CCC 2 thermostat cannot be reached by either all of the power module boards or just one of them.
The code should specify the zone that has lost communication, and a screen display should provide that information.
Any newly added zones with lost connection will have the original code flashing next to them.
Using the system reset protocol is the first approach to fixing this problem.
You must locate the cable that connects the thermostat to the rooftop air conditioner if that doesn’t fix the issue.
After disconnecting the cable, the system must be reset, therefore ensure sure both connections are solid.
Alternately, replacing the thermostat could be the best option if a system component failed elsewhere.
If your thermostat is still under warranty, you shouldn’t touch the AC or it.
If you do this and break anything, the warranty is useless, and the repair will cost a lot of money.
When this code appears, it is advisable to see a licensed repairman who can run the diagnostic and troubleshoot.
The Duo-Therm Thermostat: Workarounds
These guidelines will be broad in nature since the wiring and functioning of the majority of thermostats are comparable.
You must first switch the AC’s circuit breaker off before taking any action.
The thermostat’s cover and primary body should then be removed using a flathead screwdriver.
The circuit board may be removed by simply twisting it after the screwdriver has been inserted into a groove.
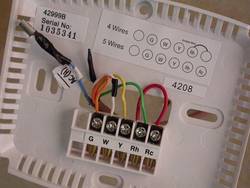
Use a Phillips screwdriver to remove the thermostats from the wall, and then mark each wire with with masking tape.
The terminals have the letters, which should be R, W, Y, G, and C.
With the help of this, you can recall which wire leads to which terminal.
Now, take the wires out of the terminals being cautious not to drop them into the wall hole.
Now, twist the R and W wires together while being mindful to keep the other 3 wires apart from one another.
Once you turn the breaker back on, the heater should turn on.
The AC unit should be tested using the R and Y wires, and the fan should only be tested using the R and G wires.
The thermostat is the source of your problems if every appliance operates when the electricity is on.
It will be necessary to swap out the thermostat.
Correctly Replace A Duo-therm Thermostat
The Duo-Therm replacement thermostat has to operate on batteries and not only as a battery backup, which is the first crucial item you need to be aware of.
This is due to the fact that home thermostats use AC power rather than DC, like an RV or TT thermostat would.
There shouldn’t be any problems either as long as the new unit has the same terminals as the Duo-Therm model, such as RC, RH, G, or something similar.
Wires must be disconnected and then connected to the new terminals as the following step in basic electrical operations.
Just be cautious to label those wires so they don’t re-slide into the wall’s hole.
Your replacement installation will need a lot more effort if you omit these steps.
Before hanging the new thermostat on the wall and covering it, make sure all the appliances are in working condition.
Get expert assistance before trying since some thermostats won’t work even if the wires are connected correctly.
By following this advice, you should be aware of the brands that are suitable with your particular RV model.
Digital versions that depend on backup batteries will not work since they need 24 volt AC energy to operate.
RVs only utilize 12-volt electrical sources since their wiring is entirely 12-volt.
Duo-Therm Thermostat Adjustment
Even with the screws provided by the manufacturer, certain Dometic thermostats cannot be changed, despite being a great convenience.
This was a problem for one RV owner, and he made futile attempts to figure out how to control the thermostat.
When he phoned Dometic, the business said, “Thank you for contacting Dometic.
However, there is no way to adjust this for a more accurate reading.
With our systems, there is a possibility that there will be a 2 to 5 degree difference between the display and the actual temperature inside your RV.
There may be extra issues with the Dometic thermostat since some people have to set it to a very low temperature in order to turn on their air conditioning.
If you’re having trouble getting it to work properly, you need to change the thermostat or the thermistor.
You may need to do some do-it-yourself repairs in order to regulate all the different zones in your RV.
Should You Replace Your RV’s Thermostat?
RV manufacturers often do not employ the best equipment in their cars.
This mindset is reflected in the many thermostats that are used to control the home comfort systems.
The majority of thermostats have analog designs and are of poorer quality.
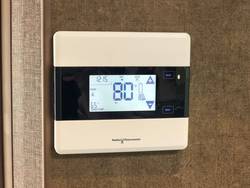
Even if your RV is still very new, consider paying a little more to upgrade the analog model to a digital one.
If comfort is important to you, a digital choice may provide you with more precise results since analog devices may be off by up to 10 degrees F.
Final Reflections
Life would be so much better if everything was in order.
Purchase the best thermostat you can afford to help improve your RV lifestyle.
As a consequence, your appliances will operate more efficiently, enabling you to relax and make the most of your RV’s interior space.
To maintain that level of comfort and avoid thermostat problems, frequent maintenance and cleaning are needed.