Keep your RV from turning into a hot box.
During the sweltering summer, replacing a normal RV vent with a vent-fan may help your RV stay cooler.
The Fan-tastic Vent and Maxxair Vent Fans are the two most common vent fans available.
Both are simple to install and are designed to suit a typical RV vent hole.
The hardest aspect, in my view, is removing the existing vent.
The thermostatic controls, the various speed settings, and the reversibility of these fans are qualities that make them highly attractive.
You just need to specify a temperature threshold, and when that temperature is reached, the fan will automatically switch on and run at the chosen speed.
The fan turns off once again as the temperature dips.
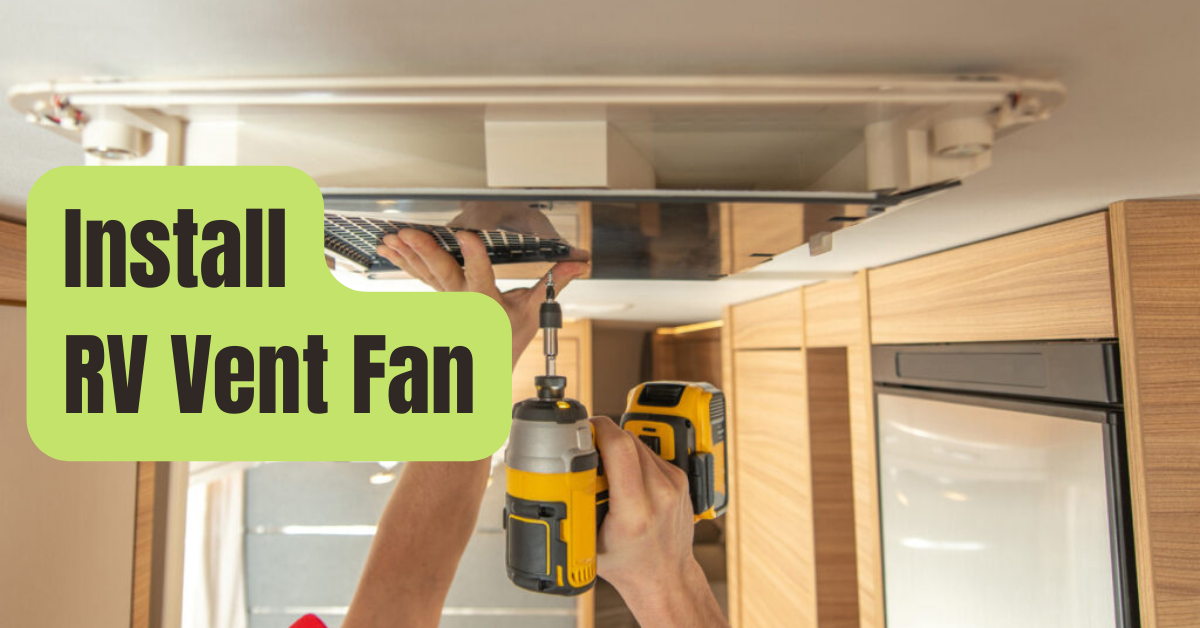
I’ll walk you through the process of removing our old vent and installing our Fan-Tastic Vent Fan in this video.
The Maxxair installation will be somewhat similar.
Step 1: Vent Removal – Take Off the Interior Plastic Shroud
Turn the knob and remove the screws holding the plastic cover on the RV.
It ought just effortlessly fall down after the screws and knob are gone.
The vent may then be removed by climbing up to the roof.
Step 2: Vent Removal – Process Is To Remove The Old Vent’s Sealant.
Dicor self-leveling sealant or a similar product will be applied to the screws holding the old vent in place.
Pry the sealant away using a putty knife or scraping tool.
Avoid using your instrument to pierce the roof’s substance.
TIP: Warm up the sealant first using a hair dryer or heat source.
It will be simpler to get rid of.
Maintain calmness and take out as much as you can.
To enable unscrewing, expose the cover’s edges and each screw’s head.
Step 3: Vent Removal – Carefully Pry Up The Vent To Remove It
Repeatedly go around the vent’s edge with the scraper tool at a slow pace until it begins to pull up.
It will likely be secured using butyl packing tape.
Work the vent’s edges gradually until you can raise it out of the hole.
Step 4: Vent Removal – Remove Extra Putty and Sealant Before Removing the Vent
Clear the entrance of all the gunk.
Your patience will be tried the most at this difficult portion of the project.
Start by using a heat gun or hair dryer to warm up the surface.
With your putty knife or other scraping tool, remove as much as you can while it’s still warm.
Avoid damaging your roof membrane by moving slowly and carefully.
With a solvent and a cloth, remove the sealing putty and ramaining putty.
I like mineral spirits better.
Mineral spirits should be freely applied using a cloth after application.
Wait a few minutes for it to start to degrade a bit.
Now, remove everything using a towel and a scraper.
Once everything has been taken out, thoroughly wipe the area with rubbing alcohol.
Before installing the replacement vent fan, make sure it is thoroughly clean.
Step 5: Sealing Up Old Screw Holes
Because the new putty and sealer will likely completely cover everything, I think this is an optional step.
Nevertheless, just in case any water leaks through the new seals, you may wish to squirt some silicon into the old screw holes.
Step 6: Mounting The New Vent Fan
Test-fit the new fan in the opening to see which way it will spin.
Then take it out.
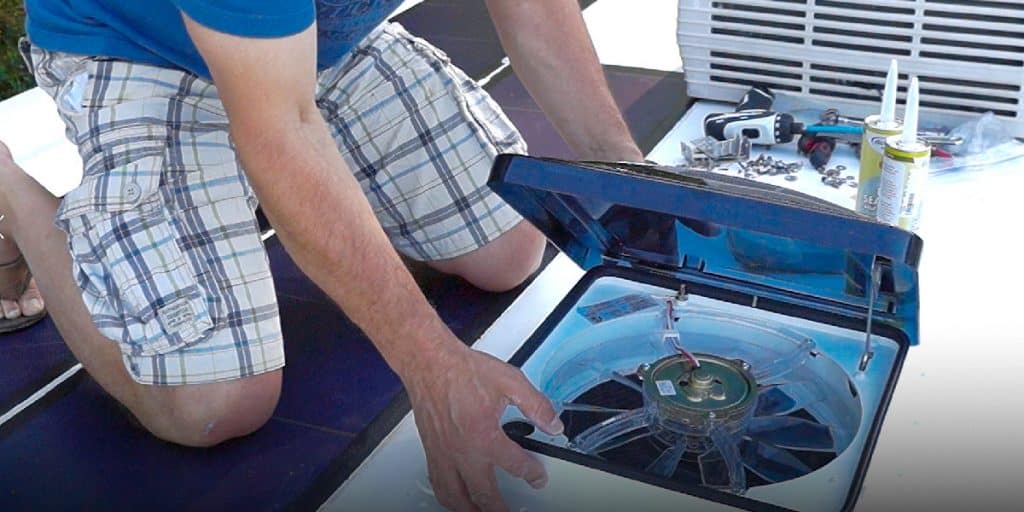
Wrap Butyl Putty tape all the way around the opening’s edge.
As your main water barrier, be sure there are no holes.
Put some pressure on the fan as you now insert it into the aperture.
In order to create a good watertight seal, you want the putty tape to slightly compress.
In order to attach the fan to the roof, last, screw the self-tapping screws through the vent frame and putty tape.
Don’t tighten too much.
Once it’s a great, snug fit, go around progressively tightening each one while letting the putty compress a bit each time.
Step 7: Apply Sealant Around The Fan
Apply liberally Dicor Lap Sealant all over the frame using a tube you may easily find.
Start with coating each screw head, then go around again and generously coat the whole edge of the fan.
Over the next 24 hours, it will gradually settle.
TIP: It’s preferable to use Dicor when the temperature is warm, above 60 degrees.
It will be challenging to deal with while cold and take a long time to settle.
If at all possible, keep the Dicor in a warm location.
Additionally, I heated it up before using it with a hair dryer so that it runs smoothly.
Step 8: Connect The Fan’s Power
The fan will be powered by 12 volt DC current.
You’ll need to splice into a nearby source, most likely a light fixture.
Follow the fan installation instructions when running the positive and negative wires to the fan and connecting them.
Test the fan’s functionality when the electricity is on.
It ought to function if everything has been done properly.
Step 9: Install The New Plastic Shroud
This is the last action.
Install the new plastic shroud with screws, then enjoy your new fan.
You’ll Need These Parts and Installation Supplies
Cooling Off While Boondocking
Generally speaking, you should steer clear of boondocking in regions where it is just too hot to be outdoors.
It will be extremely heated inside your RV while it is uncomfortable outside.
Everybody’s degree of comfort varies.
What about you? When your RV becomes warm, it…
Simplest Method For Cleaning A Dirty RV Roof
Here are some pointers for maintaining the cleanliness of your filthy RV roof all year long.
Replace The Ch751 Locks To Secure The Compartments In Your Rv.
Did you know that many fifth wheels, travel trailers, and other RVs use the same storage compartment key? It is real.
Your storage compartments could be available to others using their key.
The RV business has a nasty little secret about it.
If any of your RV storage spaces…