Atwood Water Heater Thermostat Replacement
Your ad blocker or anti-virus software (or an anti-tracking cookie option in an antivirus application) is to blame if you can’t view the photos on this page.
Please think about blocking it or adding bobsguides.com to your whitelist.
Disclaimer: I’ve written this page on RV repairs I’ve done in the hopes that it would be useful to others who are experiencing the same issues.
As a non-certified RV mechanic, I disclaim all responsibility for the accuracy, effectiveness, or unintended consequences of the fixes mentioned here.
The outcomes of any effort to utilize the information on this website are not my responsibility.
Your water heater’s thermostat may malfunction in one of two ways, and they all do eventually.
Either there is no hot water at all, or—as just occurred to me—on both gas and electricity, the water heater never shuts off, resulting in water that is dangerously close to boiling.
The second scenario might not only badly burn you but also damage your plumbing since the water is not only hot but also under more pressure than normal.
The first scenario is inconvenient, particularly if you need to take a shower.
When you run hot water in the sink, it will steam wildly, letting you know the water is too hot.
Even with the hot water on full, you usually only need a tiny quantity of cold water while taking a shower.
You must have the cold on full and the hot practically off when the water heater overheats.
Of course, you won’t have any problem finding out if you don’t have any hot water at all.
There are numerous reasons why there isn’t hot water, but the thermostat is usually to blame.
The thermostat is always to fault if the water is excessively hot.
It nearly always makes sense to replace the thermostat first since it is inexpensive, simple to repair, and will ultimately fail.
You’ll have a spare if it’s not too awful.
If you don’t want to spend the money on the replacement kit, you may remove the wires and test the thermostat using a continuity tester.
There should be continuity between the connections when the water is cold.
There shouldn’t be when the water is heated.
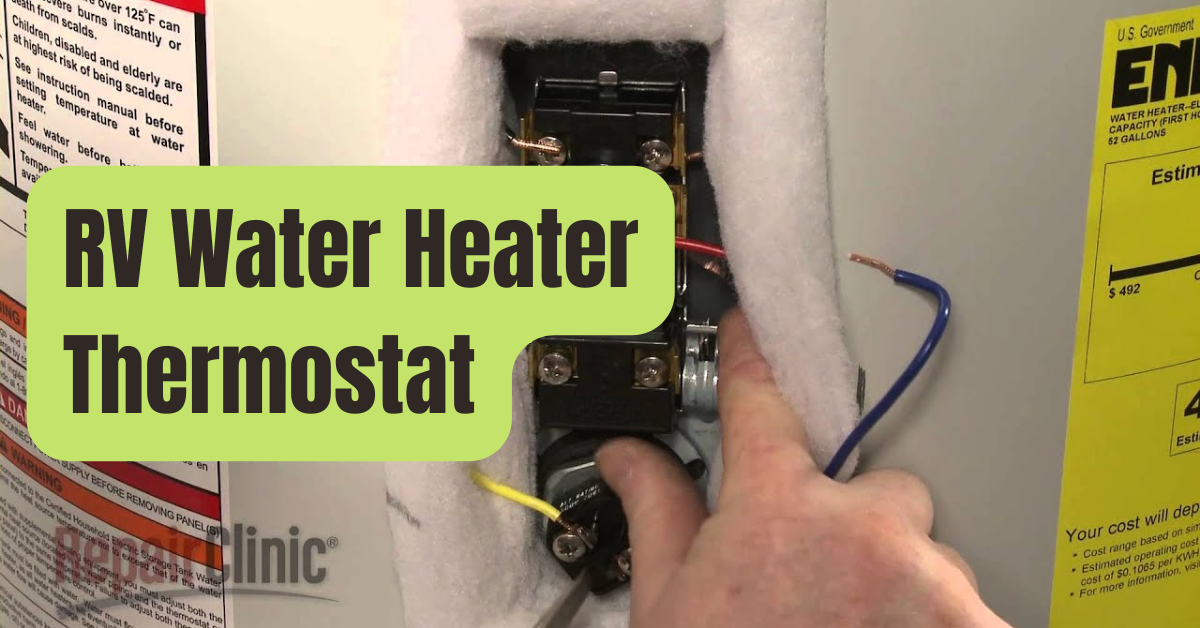
Your Atwood water heater has two thermostats, each of which is affordable and simple to change.
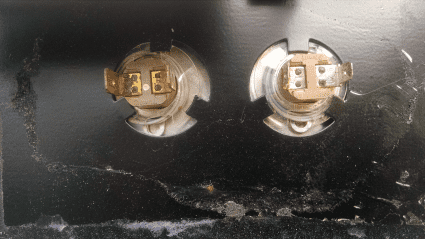
You should see a rectangular, black portion of insulation similar to the one in the image below when you open the door of your water heater.
There are two wires connected to each thermostat.
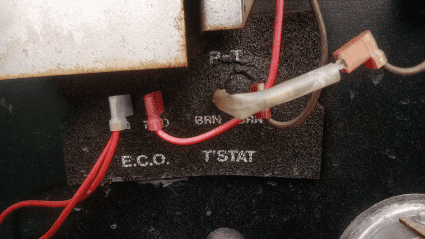
The real thermostat that regulates the water’s temperature is the one on the right in the image above (T’Stat).
Although it is technically a thermostat as well, the device on the left is referred to as an E.C.O., which stands for Emergency Cut Off.
If the water temperature becomes too high, the E.C.O. cuts off the propane.
It only works when using LP to heat the water; using electricity to do so has no impact at all.
You just need the kit shown below plus a screwdriver or other thin piece of metal to swap out the thermostat and the E.C.O.
The task is not at all challenging and should just take you 20 minutes.
The task’s sole challenging aspect is taking the two thermostats out of their evil packaging.
They are covered neatly in plastic shrink wrap.
Be cautious not to cut the transparent plastic disk that is located beneath the contacts of each thermostat while removing the plastic.
Remove the previous ones first so you can inspect the disk.
It is simple to replace the thermostat and E.C.O.
(both are included in the package).
It takes approximately 20 minutes, and it might help you avoid a costly repair visit (where the components would almost surely cost more).
Taking the Wires Out
Remove the ground strap from the house and chassis batteries before starting to replace the thermostats.
While operating, you don’t want any electricity near the contacts.
If your boat has battery disconnects, you may turn them both off instead (with no AC power to the boat), but make sure there is no DC voltage in the water-heater compartment by using a circuit tester to verify.
Since the tank’s thermostats are on the outside, there is no need to empty it.
The cables’ location should then be noted.
The two T’Stat wires are brown, whereas the two E.C.O. wires are red.
Their labels serve as a reminder of this.
To avoid having to resort to these images while replacing them, you may wish to snap a photo of the setup.
You can set the metal tabs on the spring holding ring when you install the new T’Stats by taking a nice close-up of each one.
It’s time to take the cables out now.
On the T’Stat wire, take note of the transparent plastic tube.
That additional emergency cutoff is there.
The element within the compartment is intended to melt and switch everything off if it becomes too hot inside (i.e., if it bursts into flames).
I really hope I never have to test if it works.
Only the wires connected to the T’Stat and E.C.O need to be removed; leave it connected to the incoming wire from the control box.
Taking the Insulation Off
You must first remove the rectangular, black insulation before you can remove the thermostats.
It could just flake off, but more often it will shatter into pieces.
With a dull knife, flat-blade screwdriver, or other tool, remove any residual fragments (a putty knife works very well if you have one).
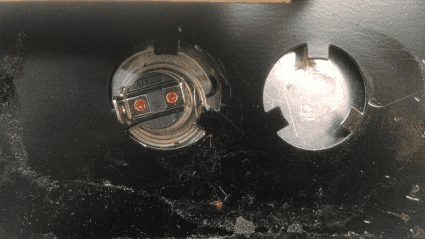
Once the wires have been removed, you can carefully inspect the two thermostats and see that the T’Stat contacts are smaller than those on the E.C.O.
When you take the units out of the packing, you may use this to identify which unit is whose.
The temperatures are also printed on the back of the units, however they are too tiny to read.
The temperature will be greater in the E.C.O.
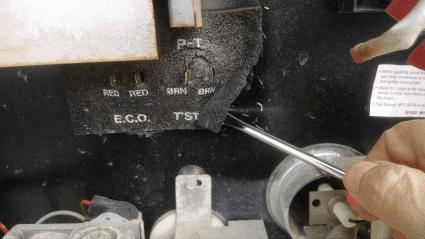
#1. Taking The Thermostats Out
The transparent plastic disks hold the thermostats in place in a peculiar manner.
See how just the T’Stat has been eliminated in the image below.
As you can see, three metal tabs protrude into the opening from the outside.
Avoid bending them.
You don’t have to do that, even if it might seem sensible to do so.
On the outside of the plastic disk are two notches.
The secret is to turn the plastic disk until one of its notches aligns with a tab, then rotate it so the disk is above the tab rather than below it by gently prying up on the plastic disk.
The thermostat will immediately come out once you’ve rotated the disk three times.
The thermostat revolves separately from the plastic disk.
The thermostat is quite delicate, particularly if it’s old, so exercise caution.
Rotating the thermostat itself may help to spin the disk since there is some friction.
By inserting a little screwdriver into one of the two notches on the disk (the one furthest from the tab you’re working on), you may spin the disk itself.
The notches may be partially exposed by moving the thermostat back and forth.
Remove the second thermostat after removing the first.
Usually, the second one moves considerably more quickly.
When they come out, you can see the tank’s outside in the hole.
Clean it as necessary so that the new thermostats may make excellent contact with it.
Swapping out the thermostats
Simply said, the aforementioned position is reversed in this one.
The replacement spring on each old T’Stat may be thicker and stronger than the new ones if your rig is older.
Reusing the previous springs will make installation simpler, but the T’Stat won’t be pressed against the water heater with the same amount of force.
I use the new ones, but I’m sure the old ones would function just as well.
Rotate the transparent plastic disk with the disk behind the tab until a notch and a tab line up.
Then, push in on the disk and continue rotating.
The thermostat is installed after three repetitions of this.
At that point, turn the thermostat so that the contacts are placed side by side in their initial positions.
This is crucial because if they are in the incorrect place, the insulator sheet won’t adhere correctly.
Verify that the plastic disk is positioned behind all three tabs and that none of the notches in the disk are aligned with any of the tabs.
Hold the thermostat in place and, if required, rotate the plastic disk with a little screwdriver.
In rare circumstances, you may need to use a little pick or knife to softly pry up the metal tabs.
I like using a sparing knife with a cheap, dull point (you can round it off slightly with a grinder or file, or by rubbing it on cement or a rock).
The knife will be quite helpful in removing old caulk as well.
#2. The New Black Insulator Sheet Being Installed
This process is easy.
In their holes, center the thermostats.
Verify that the text on the insulator is upright.
Press it on while aligning the slits with the contacts on the thermostat, working your way out from the center.
Even while the factory work may have looked better, it doesn’t really matter.
Make sure the contacts are completely visible.
Change the Wires
Place the wires where they were before.
Important: Prior to turning on the power again, make sure the tank is full if you emptied it (you didn’t need to).
After reinstalling the wires, pinch the insulator material around the contacts to help keep moisture out.
Re-connect the power, then keep your fingers crossed while you wait for the water to warm up.
If it does, you should be pleased since you are a mechanical genius.