So, you acquired that new RV, located the ideal camping spot, and connected up the water, electricity, and TV.
Then you switched on the television and there was nothing…
What are your options now? There’s no need to be concerned; the problem will most likely be simple to resolve.
What Exactly Is An Rv Antenna Booster Switch, And Where Can You Get One?
Almost all RVs have a booster fitted to get the most channels out of your antenna.
This is fantastic, but if it’s configured incorrectly, you may not receive anything.
What Happened To It?
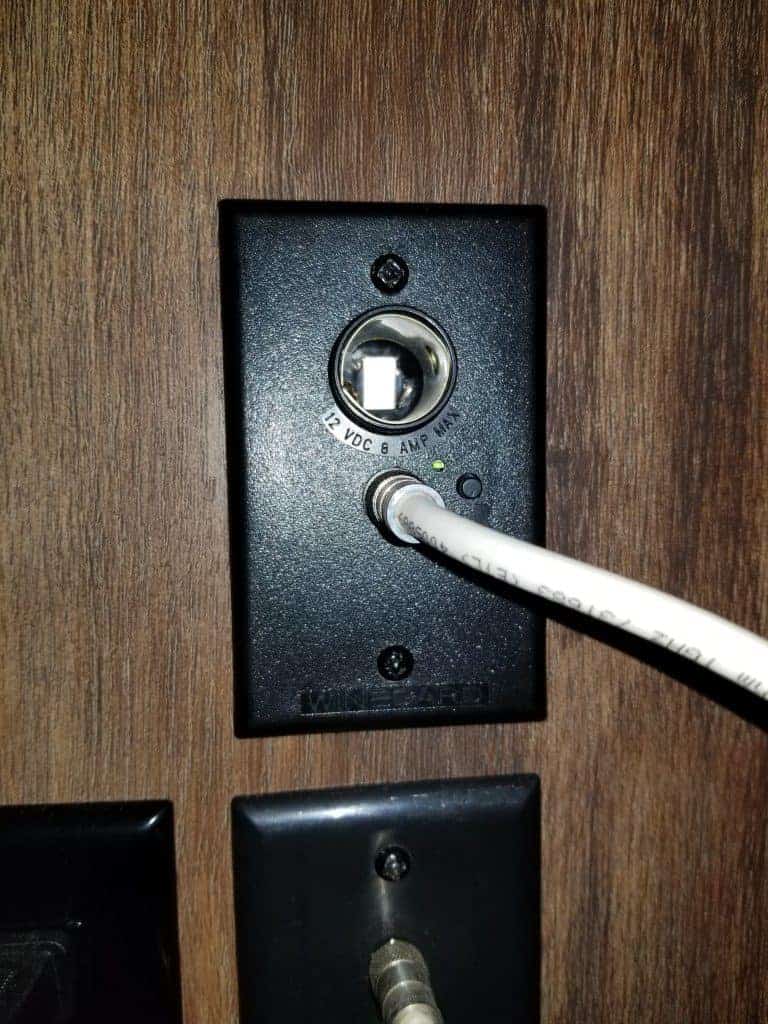
In most RVs, the booster is situated behind the primary television.
Winegard boosters are used in the majority of RVs.
They come in three different configurations: two cable jacks, one cable jack with a 12v power outlet, or a single cable jack.
The item to look for, regardless of the model you have, is a little black pushbutton and a green led.
The booster in my fifth wheel is seen below.
Check the various TV places in your RV if yours isn’t behind the main TV.
How To Configure The Antenna Booster In Your RV For Cable
The booster may be used as a switch as well.
It decides which signal is sent to your RV’s TVs.
The green LED on the booster illuminates when it is switched on, and the signal from the antenna is transmitted to your TVs.
The LED will turn off when you push the black switch, and the signal from the cable input on the side of your RV will be delivered to the TVs.
As I already said, certain boosters have two jacks.
Satellite is the name of the second one.
A satellite receiver would be connected to the jack.
If your RV has a satellite dish, it will be directly linked to this connector.
If you don’t have a satellite dish, it’s most likely linked to a Satellite jack on the exterior of your RV.
This is where a portable dish, such as the Wineguard Playmaker, would be connected.
The booster switch has no effect on the satellite jack.
Related: Dish vs DIRECTV for RVs: Which Is Better?
Checking The Settings On Your Television
Now that we’ve established that the booster is properly configured, it’s time to do a channel search on your television.
Every TV is a little different, but the majority of them share the same fundamental features.
To find an option like setup or Channels, click the Menu button on your TV and seek for it.
If you want to access the channels menu on my TV, make sure it’s in TV mode.
If you’re viewing a DVD, make sure the input is set to TV or tuner.
Look for an option to change it to Cable, Air, or Antenna after you’ve gotten to the setup or channel panel.
Select the best option for your connection.
If your TV is anything like mine, it may include an auto search feature that searches for cable and antenna channels.
Now, start searching for channels and wait.
You should start seeing channels appear shortly.
You should be fine to go after the scan is finished.
Examining The TV Wiring In Your RV
If you’ve completed the previous two stages but still haven’t had any luck, it’s time to look at the wiring.
Checking to determine whether your booster was wired backwards at the factory is one of the simplest things to do.
To check this, flip the switch to the other side and let your TV search for channels once again.
If your cable begins functioning while the booster is turned on, you’ll need to remove the booster from the wall and swap the Antenna and Cable wires.
Before exchanging the cables, double-check the channels on the campground’s TV guide.
It’s possible that you’re choosing channels from your antenna.
Check The Cable Signal At The Campsite.
The second thing I’d verify for cable is that the campground’s connection is operational.
If your cable connection is long enough, detach it from the RV’s side and route it through a window to the rear of a TV’s input.
After that, do a channel scan.
If it works, you may be certain that the campground’s signal is strong.
Things become difficult if the campground’s signal is strong.
Try a different TV in an RV with numerous TVs to check whether it works; if it does, the issue is most likely with the connection to that particular TV or connection; if the other TV doesn’t work, the issue is most likely with the booster.
An Overview Of Television Wiring
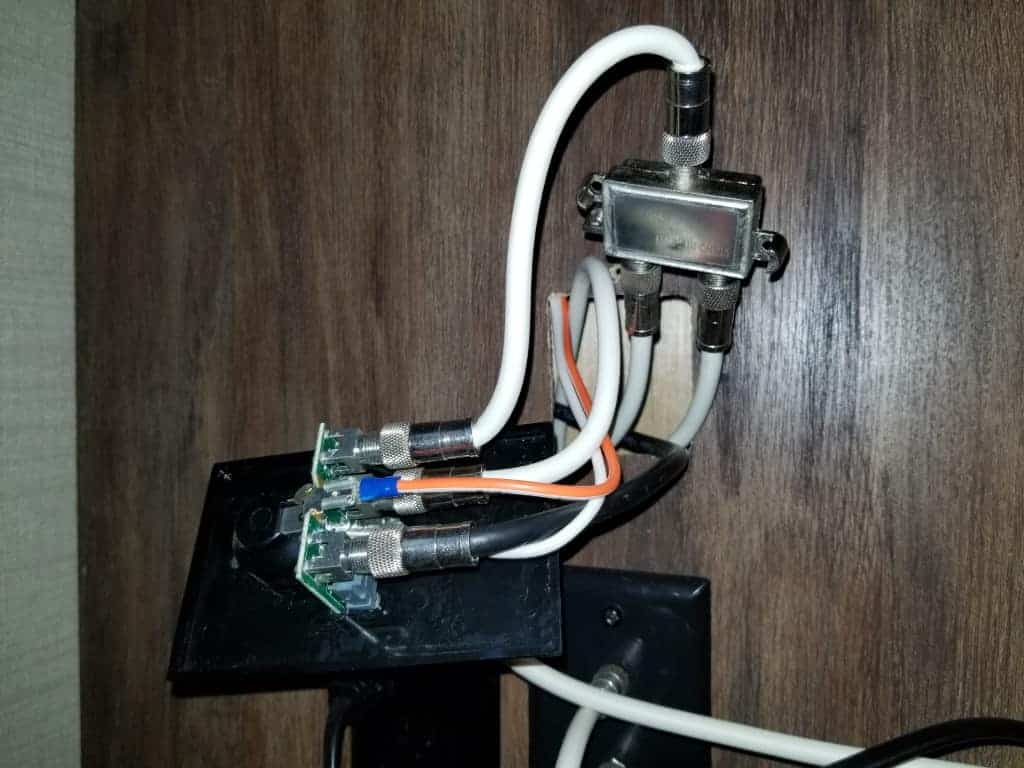
Your TV wire enters via an external jack, connects to the booster, and then separates off to the various TV places throughout the RV.
Unlike in residences, where the splitters are frequently visible in attics or basements, RV makers hide the splitters behind the jacks in the walls.
A splitter I ripped out of the wall behind my booster is seen here.
In the bedroom, I discovered another one behind the TV jack.
Suggestion: How to Get an Outdoor TV on Your RV the Easy Way
How To Check The TV Wiring In An RV
An ohm meter may be used to test the connection between the exterior of your RV and the jacks on the inside.
Needed equipment:
- The ohmmeter is a device that measures the
- Line of Long Cable
- Cable line is short (1 foot or less would be best)
Steps
- Connect the lengthy cable to the exterior jack and then inside the camper with the other end.
- Connect the short wire to the cable/antenna jack on your television.
- Set your Ohm meter to ohms or continuity and place the probes on the wire in the middle of each cable.
- If your meter detects a connection between the wires, your wiring is most likely in good working order.
- Switch the booster to the other position and try again if you don’t see a connection between the cords.
If you can’t make a connection between the wires, you’ll have to dig a little more to figure out what’s wrong.
The easiest approach to examine the wiring is to remove the jacks one at a time, beginning with the booster, and double-check that all connections are secure.
Drag on the wire a little bit after removing a jack from the wall; if it moves, keep tugging gently and you may be able to pull a splitter through the gap.
Check for tight connections and tuck the cables back into the wall.
After that, go on to the next.
After you’ve sorted up the wiring, go back to your TV’s channel search and you’re done.
Wrap-Up
I hope I was able to assist you in getting your RV’s TV to operate.
Between the external cable connector and your TV, there may be a video switcher or other equipment if your RV comes with a satellite receiver or surround sound entertainment system.
I won’t be able to cover all of your choices here, but your RV’s owner’s handbook may provide some useful information.
If you’re searching for some advice on how to enhance your over-the-air (antenna) signal, read this post for my best advice.
The final piece of advice I have for you is to go outdoors.
I like watching television just as much as the next person, but while I’m camping, I want to go out and explore the surroundings.
Explore the trails, take a trip around the area, or just relax around a campfire.
When you come home, you can always watch TV.
Thank you for taking the time to read this, and have a wonderful camping trip!
Recommended: Best RV TV Shows of 2026