Summer is a fantastic time to go camping since the weather is warmer, there are less rainy days, and there are more recreational opportunities in the great outdoors.
Most people go camping in the summer, which means campsites are likely to be busier and more booked, and you’ll need to prepare early to enjoy a relaxed, stress-free camping experience.
When you camp in an RV or trailer, you have additional conveniences and luxuries in your home away from home, which makes camping even more pleasurable throughout the summer.
The air conditioner is undoubtedly the most important of these—what better way to unwind after a long, hot day in the sun than to go inside your camper and turn on the air conditioning?
But what happens if the air conditioner in your RV breaks down? Is it possible to recharge the air conditioner in an RV?
Your camper air conditioner must be recharged with Freon as needed in order to function properly. Fortunately, you can recharge the air conditioner in your RV! However, depending on the sort of A/C unit you have in your RV and where it is positioned, it may be simpler or more difficult.
In this post, I’ll go over how to recharge your air conditioning unit, as well as the many sorts of problems you could have with your RV’s air conditioning system and RV A/C maintenance advice.
How to Recharge the Air Conditioner in Your RV
Because RV A/C systems are not normally meant to be opened and fiddled with, recharging the one in your RV may be a little more difficult and complex if you have an air conditioning unit at home.
In fact, depending on the type and its placement in your camper, opening it may cause harm to the A/C mechanics or unit casing.
A top-off is merely adding extra refrigerant to your A/C unit, however a complete recharge of your RV Air Conditioning system involves replacing and/or filling up an empty coolant tank.
Because the amount of coolant or refrigerant liquid might impair the A/C unit’s performance, a top-off may be necessary.
Follow these instructions to recharge your RV’s air conditioner and replenish the refrigerant:
- Turn off the electricity to your RV’s air conditioner. Before working on the air conditioner, make sure the electricity is turned off. Locate the breaker panel in your camper and turn off any breaker that gives (or may supply) electricity to your RV A/C.
- To determine the brand of refrigerant or coolant to use, see your RV’s owner handbook. A/C Pro ACP-100 is a popular model, however your RV may need a different brand or model. (Note: Do not mix and match brands, as this may result in irreversible harm to your device.)
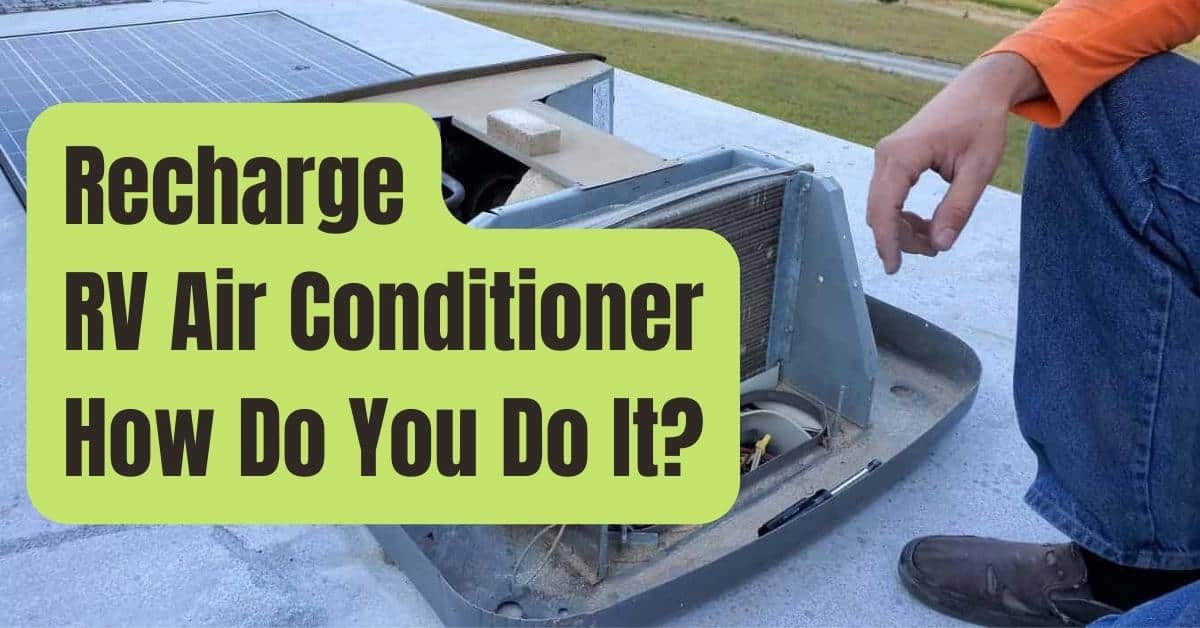
- Remove the plastic lid or cover for your air conditioner from the top of your RV and raise straight up to avoid damaging the system coils. Keep an eye out for bees or wasps departing the unit, since these insects are known to build nests within. If you come upon a nest, you must remove it as quickly as possible.
- Find out how much refrigerant is left in the system by using a coolant gauge. With certain A/C models, this may be easier said than done. You may need to install a line tap, which is a device that enables you to access the coolant line and connect a gauge, if there is no convenient method to monitor the refrigerant levels. You’ll be able to tell whether your refrigerant levels are low or empty once you can check them. If the refrigerant evaporation temperature on your gauge falls below 30 or 40 degrees, it’s definitely low and has to be recharged. If the levels are not below average, the RV air conditioner may have another problem.
- Pour in the coolant. While you add the coolant, turn on your air conditioner and have a buddy stand inside the RV to check the air temperature levels. Unscrew the coolant port with a tool and gently fill it with refrigerant until it is full. Monitor to see how much coolant your A/C unit can carry before adding the refrigerant, and be sure to check refrigerant levels as you add the fluid. When you’re finished, your companion should notice a difference in the temperature inside the RV. The temperature differential between the air in your RV and the air in the A/C unit should be about 20 degrees.
- Put the unit back together. Replace the plastic cover on the RV air conditioning unit and tighten the coolant port cap using a tool.
- Turn it on and put it to the test. Reconnect the electricity to your air conditioner, switch it on, and keep an eye on the temperature for several hours to ensure it’s operating correctly.
If recharging the unit does not resolve the problem, you should see a mechanic or RV professional.
However, there might be another typical problem preventing the air conditioner from working correctly.
Read more: 8 Best RV Air Conditioners To Buy In 2026
Other RV Air Conditioner Problems and How to Fix Them
Before you disassemble your RV air conditioner to recharge it, you could discover that it’s suffering from one of these typical problems that reduce the unit’s performance.
A Filter in Your Air Conditioner That Is Dirty
Fortunately, one of the most frequent reasons of difficulties with an RV air conditioner is a filthy filter, which can typically be cleaned or replaced cheaply and easily if necessary.
If there’s a lack of ventilation within your RV, the A/C unit is freezing up (which I’ll explain next), or the A/C isn’t giving out enough cold air, even when the power is turned up, you could have a filthy filter.
It’s critical to clean or replace a filthy filter as soon as you spot a problem, since it may create electrical issues, which can harm your RV air conditioner or transmit allergies or germs throughout the vehicle.
You must first switch off the electrical power to the unit and remove the plastic cover on top before cleaning or changing the air conditioning filter in your RV.
To prevent harming the filter or the A/C system, read the user manual for your RV’s A/C unit before removing it, and never switch on the air conditioner without one.
If your filter is reusable, you may clean it using the following methods:
- Vacuum – Set your vacuum to a medium or low setting and point the nozzle or brush towards any visible dust or filth. To prevent denting or shattering it, don’t push too hard.
- Submerge – Soak the filter in a sudsy solution of lukewarm water, mild detergent, and dish soap. Submerge the filter and stir it about a little to make sure it’s well coated, then set it aside for 10 minutes (or up to 2 hours if it’s really filthy). Scrub the surface of the filter with a light brush if necessary.
- Disinfect – Bacteria may still be on the filter, which you don’t want to contaminate the air quality inside your RV. Prepare a solution of equal parts white vinegar and water and spray it on both sides of the filter to disinfect it. Before washing the filter, let it rest for approximately 10 minutes.
After you’ve finished cleaning your filter, let it air dry for several hours before reinstalling it in your RV air conditioner.
6 Reasons Why Your RV’s Air Conditioner Is Frozen
Some air conditioner problems might cause the unit to “freeze up,” resulting in ice chunks around the vents or within the unit (you may notice water or condensation forming and dripping).
When your RV’s air conditioner freezes, it’s an issue that has to be addressed right once. It may be caused by a variety of factors, including:
- Refrigerant or coolant levels that are low or empty
- Filters that are dirty
- There is a lot of dampness in your surroundings.
- Flow dividers that are not working
- Condenser or evaporator coils that are dirty
- Thermostat has failed.
Ice may form if there is too much humidity.
Your air conditioner may freeze if there is too much humidity in your area.
This is due to the A/C unit’s inability to keep up with the quantity of moisture in the air, causing the condensation to freeze.
However, there are several things you can do to avoid this or deal with it if it happens:
- When you’re in a high-humidity environment, turn up the fan or add more fans to the RV to keep the air flowing.
- If you haven’t done so lately, clean your air conditioner.
- If you often camp in humid areas, invest in a dehumidifier to remove moisture from the air within your RV.
The A/C unit may freeze due to faulty Flow Dividers.
Bad flow dividers are another cause of freezing. Flow dividers, also known as baffles, keep the hot and cold air apart.
Cold air might seep into the hot air input if the flow divider is not correctly sealed or positioned, causing ice to build on your A/C unit.
Repositioning the flow divider and resealing it with HVAC foil tape is the best method to remedy it.
Freezing may be caused by dirty evaporator or condenser coils.
The majority of reasons why RV air conditioners freezing up have to do with airflow, and the majority of airflow issues are caused by filthy condenser or evaporator coils.
To avoid problems, you should clean these coils on a regular basis. Your A/C unit will have to work harder to move heat out of your RV (condenser coils) and chill the air inside if the coils are dirty (evaporator coils).
Follow these methods to clean your condenser and evaporator coils:
- Turn off the electricity. Unplug your RV from the electrical connection at your campground, switch off your generator and unhook your batteries, or simply turn off the air conditioner breaker. The trick is to make sure the A/C unit isn’t getting any electricity.
- Take the blankets off. Remove the plastic cover for the air conditioner from the top of your RV – be cautious, as wasps and bees prefer to establish nests in these units. The condenser coils are at the rear of the device, while the evaporator coils are at the front, after the main cover is removed (covered with a sheet metal housing). Remove the housing with a screwdriver, being cautious not to harm the gasket that keeps water out of your RV.
- The coils should be vacuumed. To prevent trash from entering into your RV, seal any air openings, then carefully vacuum both sets of coils with a gentle brush attachment.
- Coils should be cleaned. In a spray bottle, combine dish soap and water and spray both coils until they are moist. Allow them to rest for a few minutes before wiping them down with a gentle cloth or brush. To eliminate any leftover dirt, give them a last once-over with the vacuum cleaner. If the coils were really unclean, you may need to repeat steps three and four.
- Reassemble after inspecting, drying, and cleaning. Examine the fins for any bent or damaged regions after cleaning the evaporator and condenser coils. You may use a fin comb or a screwdriver to straighten them out. After the coils have dried, scrub down the interior of the A/C unit’s plastic cover to make sure it’s clean as well. Then, reinstall the evaporator coils’ sheet metal casing and replace the (now) clean plastic cover.
Your A/C may be freezing due to a broken thermostat.
If you have a damaged thermostat, your RV air conditioner may freeze up. You can typically tell if this is the case if your A/C only works when you keep turning down the thermostat.
If your thermostat is faulty or outdated, you may need to replace it. Check your thermostat’s reading with a thermometer to see whether it’s correct, then compare the two.
If they’re the same or extremely close, your A/C problem isn’t caused by the thermostat; but, if they’re not, you may need to replace it.
Read more: Solar Power for RV Air Conditioner: Is It Possible?
Air leaks may wreak havoc on your air conditioner.
Air leaks might be one of the difficulties you’ll identify as the reason when your RV’s air conditioner isn’t operating correctly, since airflow issues are the most prevalent source of problems with an RV’s air conditioner.
There might be a leak in the air duct system if the A/C unit does not provide a strong airflow.
If you remove the cover and look for any holes or cracks in the air ducts, you should be able to detect the leak. You may quickly and simply address the issue by covering them with HVAC tape.
Wiring damage may reduce the efficiency or operability of an air conditioner.
If you’ve examined all of the other frequent problems I’ve outlined, you could have an electrical problem with your air conditioner’s wiring.
Water damage, overheating, animals nibbling on the wires, and natural wear and tear are all potential causes of wiring issues.
Remove the plastic cover on top of your RV to determine if any of the wires are broken if any of the plugs stop functioning.
You can change them yourself, but if you’re not sure, it’s best to see an RV mechanic or electrician.
If you’ve tried all of the do-it-yourself alternatives and still can’t get your RV’s air conditioner to work, you may need to hire a service specialist to diagnose and repair the issue.
Defrosting the Air Conditioner in Your RV
I’ve previously covered how to change a filthy air filter and what to do if your refrigerant is low. You’ll need to thaw your RV air conditioner before you can address most of the other issues:
- Step 1: Remove the cover from your RV’s air conditioner and turn on the fan (not the cooling feature).
- Step 2: Turn on the fan on high to melt the ice buildup (this may take a few hours), and put a bucket and towels below to collect any dripping water.
- Step 3: After the ice has melted and the air conditioner has been defrosted, let it dry overnight (leave the towels and bucket to catch any remaining drips).
Tips for Maintaining Your RV’s Air Conditioner
You probably noticed some things that seem like maintenance as you read through the different problems that could cause your air conditioner to stop working or function inefficiently as you read through the different problems that could cause your air conditioner to stop working or function inefficiently as you read through the different problems that could cause your air conditioner to stop working or function inefficient
You may really prevent these difficulties if you arrange regular maintenance for your RV’s air conditioner.
Maintenance should be performed before and after each trip, particularly if you only use your RV for a few of trips each season.
Regardless, if you check the air conditioner and other important systems before and after your camping trip, you may identify a lot of typical problems before they occur, or at the very least before they become more major concerns.
A/C Filters Should Be Cleaned
As I previously said, a filthy air filter in your air conditioner may create a variety of issues, including freezing, poor air quality, and a malfunctioning air conditioner.
It’s also one of the simplest and most cost-effective ways to keep your air conditioner functioning efficiently.
Check both the filter inside your RV and the filter inside the plastic cover on your camper’s roof when inspecting your A/C filter.
Vacuum, clean, and disinfect the filter on a semi-regular basis using the techniques outlined above (at least once per camping season).
Replace it as soon as possible if it begins to break down or becomes damaged.
The A/C Unit Should Be Cleaned
I discussed how to clean the evaporator and condenser coils of your air conditioner earlier in this post.
Because water, filth, insects, and other small creatures might get inside and impact the unit’s performance or efficiency, it’s a good idea to clean these and other components of the upper rooftop compartment of your air conditioning unit on a regular basis.
The condenser and evaporator coils must be kept clean because clean metal fins inside the coils enable air to travel through more freely.
You should also examine and clean other sections of your rooftop air conditioning equipment, such as the motor, fan, and fluid lines, after you’ve cleaned the evaporator and condenser coils.
As you travel, these components gather rust, moisture, dirt, and other debris.
First, wipe any debris or grime from the unit and lubricate the motor bearing on your A/C unit (but never spin it yourself, since you could cause damage).
Next, clean the fan and fluid lines of any dirt or filth, and treat any rusted areas. Re-seal the air conditioning unit after you’re finished, and you’re ready to go.